Robert C. Moon
 Robert Moon recently graduated from NYU’s Interactive Telecommunications Program (ITP) and currently pursuing a career in the field of interaction design and information architecture. For his thesis, Robert spent the better part of the year researching conversation analysis to develop a mobile voIP conversation game, where callers are randomly connected together to share in an anonymous conversation and scored on “good” conversation characteristics. Before ITP, he worked in post-production as an editor and motion graphics designer for commercial/broadcast/web.
Websites
Site: http://nullobjects.com
Blog: http://nullobjects.com/blog
For Day 4’s project, Christian Bovine and I wanted to shoot a short video within 24 hours. A friend of mine in San Fransisco recently finished a 48 hour Film Festival, where contestants were given requirements such as character name or prop right before starting the 48 hour film production. Apple has a similar competition but 24 hours so it is definitely possible to complete. We decided that we wanted to attempt a similar constraint and created a web application that allowed ITP students to fill out possible requirements of a character’s name, prop and line of dialogue. We randomly chose: Mimmi Vanilla, cow and “Your chile is long.” We both agreed to wake up early to discuss possible concepts but instead I mentioned to Christian that “I feel like a zombie,” thus the birth of our new concept and tossing out the requirements all together. We developed the idea for Zombies attending ITP and asked the faculty and students to participate. Here is our video that we finished within a day. Enjoy.
|
August 1st, 2008
I living in Manhattan for the past two years while I attended ITP in a neighborhood appropriately named “Alphabet City,” East of the East Village. My roommate at the time lived there for 11 years before I moved in and always talked about how much the neighborhood underwent quite the dramatic change, both good and bad. Such changes he was referring to was gentrification. Merriam-Webster dictionary defines gentrification as “the process of renewal and rebuilding accompanying the influx of middle-class or affluent people into deteriorating areas that often displaces poorer residents.”
So after I graduated, I started looking for places out in Brooklyn and like many people, I started my search on Craigslist. I’m sure every person looking for a place in New York City has seen listings purposely miscategorized by real estate agency, in the hope of getting a user to click to view details or even worse, get you to make the trek to see the place. One of my favorite examples is the listing of “East Williamsburg,” when in actuality the place is in Bushwick proper. By re-branding less attractive neighborhoods, real estate agencies are hoping to get people on the border of barely affording “nicer” neighborhoods to living comfortably in a “poorer” and often urban area of town. They are usually artists, then students, then hipsters and not for long rents prices go up, ultimately pushing local residents further away. The neighborhood landscape changes as well. Not for long, liquor stores and 24 hour pickup or delivery greasy food establishments are replaced by Whole Foods grocery stores and cafes serving 8 ounce wheat-grass beverages for 4 dollars. The beneficial side effect of gentrfication is that crime levels often drop significantly. My guess is the police is willing to protect the well-off than the poor and struggling.
So in the beginning of May, I moved out to Bedford-Stuyvenant, often referred as “Bed-Stuy.” This neighborhood has yet to become “gentrified,” but earlier signs indicate such a change will occur sooner than later (after all, I moved in and I’m a student). I was walking home recently and because of the recent hot weather, families would sit outside, often late. A young girl, could not have been older than 8 years old sees me walking past her and she says to her father siting on the stoop, “Why is all these white people walking down our street?” I quickly replied to correct her to say, “I’m not white, I’m Korean,” which was followed by an uncontrollable laughter of her father. She doesn’t know it at the time, but that girl is talking about gentrification.
For my 5-in-5 project, I decided I wanted to silk-screen t-shirts, printed with the re-branded name of “East Fort Greene.” I wanted to beat real estate agencies to the punch, and bring awareness of changes in the neighborhood of Bed-Stuy. I would like to be clear in stating that I am neither for or against the gentrification process. There are both positive and negative effects of such changes but ultimately the real estate agencies make out on top. I did not anticipate the preparation needed to start silk-screening as well as the expenses needed to fund such a project. So today I spent the majority of my time building screens for the pressing the image onto the t-shirts and designing the image/text for the shirts.I also learned that it takes around 12 hours for the photo emulsion to dry, before a single print can be made. So in the mean time, here is my design for the t-shirts I will be printing tomorrow as well as write/shoot/edit a film with Christian.

|
July 30th, 2008
I worked with Christian Bovine and Dennis Crowley for our Day 2 project: Average Athlete versus Olympic Athlete. My day started bright and early at 6 am so I make it on time to meet the two average athletes at the public pool on the corner of Pitt and Houston. We were quite lucky that the pool supervisor let us shoot that day for the 100 meter freestyle. For our next events, we shot the track and field events at the East River Park and ran into camp councilors who helped us properly set up the hurdles and long jump events. And for our final rings event was held at the Neistat Brothers studio where they have a set of rings set up for doing the “muscle up.”
As the person behind the camera, I wanted to match the camera angles with the Olympic trials footage we used for this project. Christian and I edited throughout the evening and set it to render over night. You can check out the video below.
External Link to Video
Special thanks to our track & field experts:
Nandi Dozier-Lewis, Andrew Olsen and Stephanie Velez
And our rings expert:
Van Neistat
|
July 30th, 2008
So my partner, Stella who I planned to work together for the first project but had the horrible misfortune of losing her precious laptop (not her fault), so she had to drop out, which left me with a free day to come up with something new. I’ve struggled all Sunday night, trying to plan something with no luck at all. I’m not much of a planner anyways, so I place most of faith on my commute to ITP to be inspire by an idea.
A few days ago, my father recently gave me a new tri-fold leather wallet, to replace my previous wallet taht was falling apart. The main reason of it’s demise was the fact that the wallet was leather and after years of abuse, like jumping in the ocean with my wallet in my pocket (by accident), the material just gave out at the seams. The wallet my father gave me was also leather, smaller and a bit thicker than what I am used to, so for today’s project, I will be designing and constructing a thinner waterproof bi-fold wallet.
I thought it was appropriate to have Bre Pettis as our guest today, since I was inspired by his earlier podcast of using plastic bags in layers as materials to build a messenger bag. His podcast can be viewed here. I will use a similar method of using plastic bags so my wallet will be waterproof. I did some research online for possible design ideas, but ended up deciding for a clean four pocket wallet.
So here are the steps to create my EcoFabulous Wallet.
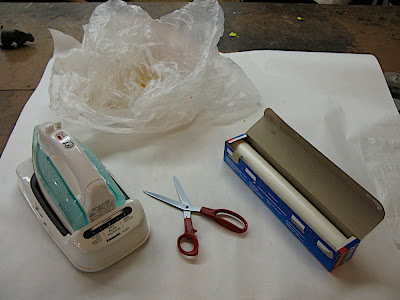
Step 1: Gathering Materials
Here are the tools and materials I used to make my wallet. An iron, scissors, plastic bags and wax papers. The tools that are not shown above are an exacto blade, cutting board and ruler (or any straight edge to cut straight lines.)
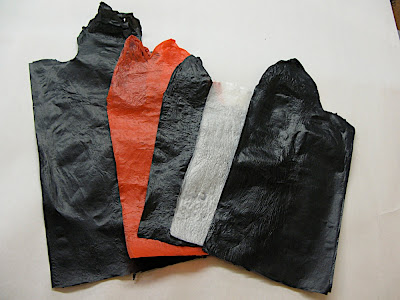
Step 2: Prepare Materials
I cut the bottom of the plastic bags and then folded the bags in half (there should be 4 layers of plastic). I placed the folded plastic bag between two sheets of wax paper and ironed the top of the wax paper on a low heat setting. There is no need to press down hard, the plastic will form a strong plastic sheet. Warning: melting plastic releases some fumes, so be sure to iron in a well ventilated area.
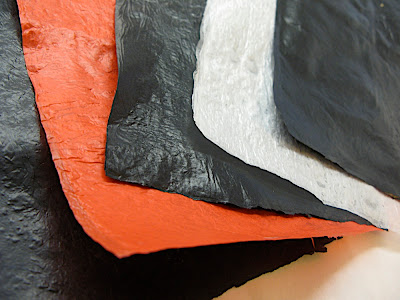
Melting the plastic bags between wax paper created a nice texture. Be sure to use different color plastic bags to increase the cool factor.
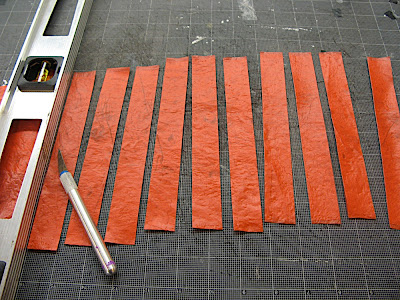
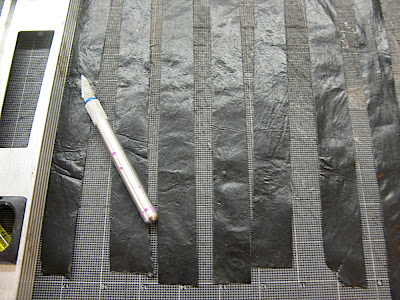
Step 3: Cutting the plastic sheets in 1 inch stripes
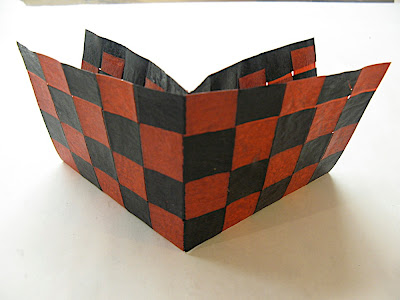
I used a cutting board, a straight edge and an exacto blade to cut 1 inch strips to be used in the pattern. Be sure that one of your colors are cut long-wise (the length of your wallet opened). I learned the hard way, but I would advise weaving the strips on top of wax paper because it is difficult to move onto the wax paper and all your hard work of tighening the week would go down the drain.

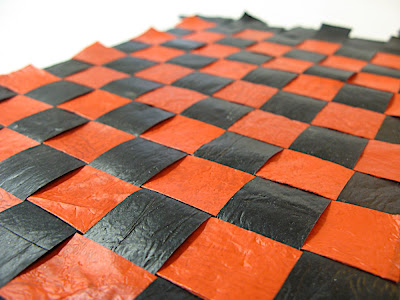
Step 4: Weave the strips of color plastic to form a cool checker pattern. Be sure to tighten the strips together so there are no gaps.

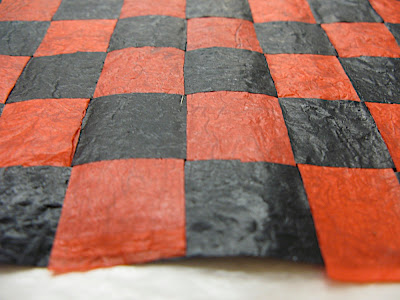
Step 5: Place the woven strips between two sheets of wax paper so that it becomes one solid woven sheet. Be careful not to over heat it or the wax paper will stick to the plastic. It’s a pain to get out. Sometime you’ll see that not all strips are melted together so just put back the wax paper and iron it again. Be sure to iron both sides too because the iron will not be hot enough to melt the bottom layers. It should look something like the photo below. I personally like the wrinkled texture. Kind of looks like leather.
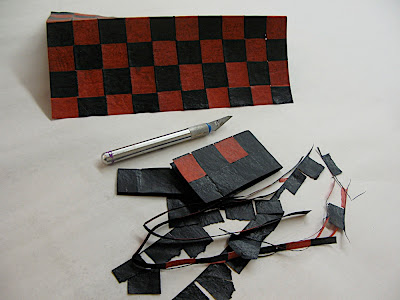
Step 6: Cut the excess rough edges
Use the exacto blade and ruler to trim the woven sheet into the dimension of the wallet. Remember to leave room to fold the bottom of the wallet. I roughly measure my wallet 10 inch wide unfolded (5 inch wide folded). This is enough for 4 pockets for credit cards.
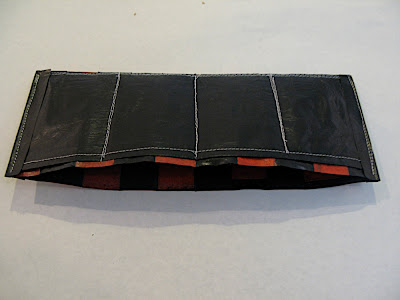
Step 7: Sewing the pockets and edges
I cut a piece of black plastic the size of the width/height of the wallet. I folded the top lip to form a hem which makes it easy to pull out inserted cards. Careful measure out 4 equal pockets so that the same size credit card can fit in all the pockets. I also added a small skinny strip of black to tighten up the edges of the wallet.
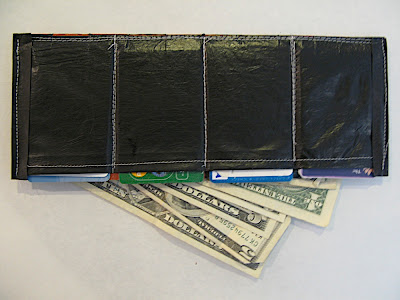
Step 8: Populate the wallet with money (preferably Euros)
If all went according to plan you should have money in the sleeves and credit cards in the pockets. I actually made the dimensions of the wallet big enough to populate it with Euro bills as well.
I had tons of fun designing/making this wallet. It took me a total of 3 hours from start to finish and cost nothing to make (I had access to a lot of the tools but they are pretty common to find among friends). If I was to build this again with the knowledge I have now, I would definitely make more room between the two middle pockets so the wallet can naturally shut on it’s own. I would also try to add a clear pocket on the outside for a visible ID so I wouldn’t have to pull out my ID to get in and out of school.
|
July 29th, 2008
 Robert Moon recently graduated from NYU’s Interactive Telecommunications Program (ITP) and currently pursuing a career in the field of interaction design and information architecture. For his thesis, Robert spent the better part of the year researching conversation analysis to develop a mobile voIP conversation game, where callers are randomly connected together to share in an anonymous conversation and scored on “good” conversation characteristics. Before ITP, he worked in post-production as an editor and motion graphics designer for commercial/broadcast/web.

 Day
Day 