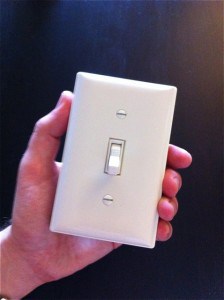
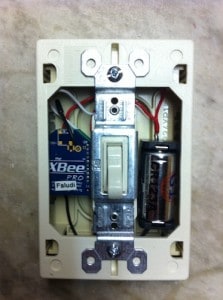
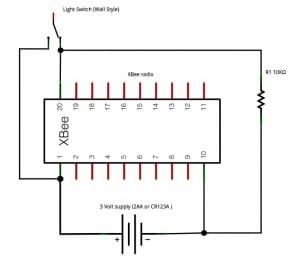
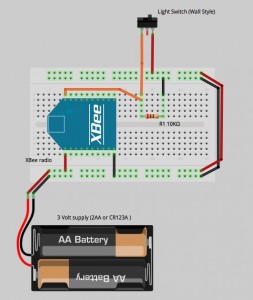
The Light Switch XBee is a wireless wall switch that can control lamps, fans, motors or your homemade robot. This project serves as a model for almost any digital input device you’d like to build. You can substitute any number of digital inputs, like a pressure mat, magnetic contacts or even a soft switch made of conductive fabric in its place. If it goes on and off, now your Series 1 802.15.4 XBee can make it wireless!
The full instructions include parts needed, configuration, soldering instructions and assembly. I’ve also added a Simple XBee Receiver so you can test your switch, and an explanation how to modify the more robust Actuator Example from my book to control A/C mains powered appliances with the wireless Light Switch.
Using the example as a guide, you can invent your own switch using any two pieces of metal or conductive material. Maybe you want shoes that turn on your toaster. Or a cat door that plays “The Cat Came Back” each time Fluffy returns from an outing. Even complex sensor ideas can often be boiled down to a simple switch solution. Get started here!


Pingback: Light Switch XBee: Example Project « Rob Faludi
hello Rob faludi ,
I am fan of your work , I recently read your book “wireless sensors networks” .
I am using xbees series 2 with arduino , to set up an EMO switch , and the light switch xbee example is very useful ,can you provide a code example if you may .
thank for any assistance
The light switch uses Series 1, which are able to mirror pins without using any code. For the Series 2 I’d start with the doorbell example in my book, which pairs a switch to an output. Also the Romantic Lighting Sensor if you want to use the XBee’s I/O features directly. That passes an analog value but very straightforward to change that to digital.
Hi, im using your book to create a point to point simple conection using xbee series 1, i already did the “better doorbell” example adapting the neccesary things but i can’t get the “romantic lighting sensor” work with the series 1, is there any suggestion that you can give to me.
Sorry for my bad english, i’m a Chilean Student.
Did you check the “Common XBee Mistakes” on this site?
Rob Faludi,
I used this example with a magnetic switch instead of manual light switch. However the LED stays HIGH after I set the switch. It will go LOW when I bring the magnet back, but switches to HIGH quickly and stays HIGH. Do you have any thoughts? Any information will be greatly appreciated.
Best,
Brandon
Is your switch normally open or normally closed?
It is a normally open switch.
hi, how long works the xbee series1 with 2batterys ? without a sleep mode ?
i would like to build a xbee light switch but the main problem is that the on and off stat of the the switch should be seen all the time…so i can.t do that with a sleep mode cause the wifi works only when i awake it with a button ?
If you cannot use sleep mode I would recommend mains power. But remember that sleeping can happen for milliseconds at a time, which will save power without serious impact on latency. Both 802.15.4 and ZigBee are designed for this type of low power operation.
I have your book and have done a few fun projects using your designs. So, now I am starting my Home Automation/Energy Management projects. The question that I have is why you used an Analog pin for the Light Switch Project. I decided to use the DIO pins as they can be programmed to go high/low with 3 volts as opposed to 1.2 volts for the Analog pins. Actually the main reason is that there are only 4 Analog pins and a bunch more Digital IO pins.
I am using 2 Digital pins DIO5 and 4 to operate 2 relays to open/close a city water supply electronic valve I installed. One Digital pin DIO7 for a water flow sensor (not sure how this is going to work out, it pulses) that I installed. One Analog pin AD2 to monitor the 12VDC 12Ah battery voltage. 1 Analog pin AD1 to monitor the small SOLAR panel voltage output. One Analog pin AD0 for a water pressure sensor and possibly Analog AD3 for the temperature of either the city water or the temperature inside the project box.
The city water meter is approximately 80′ from the Controller, but I have a Xbee in use on the same Pan ID that I use to monitor the water levels in my 10 rain barrels, so since Routers can be setup to talk to each other and pass the signal, I am hoping this will eliminate any distance problems. Still concerned about the flow sensor being accurate.
Love your book, I am constantly using it to answer my questions. Well worth the money even though it is the first edition (2010). Yes, I have had it a long time. You can see my Energy Management 220VAC monitoring system on my website http://www.how-to-doit.com. I will be adding this project to it with a reference to your GREAT book.
Thanks for writing it!!!!!!!
Glad to hear the book is useful for you! The analog input pins on the XBee are also available for digital i/o. When they are configured to be digital, the voltage requirements are the same as any other digital pin. So in the Light Switch example we configure the first pin as digital and that works fine. That example doesn’t need anything configured as analog so we’re not concerned about it. Sounds like in your project you require analog inputs, so reserving those pins for that purpose makes sense.
Good luck with the project. It sounds like you are trying to conserve your city water use? If so, any projections as to how much water you can save?