
Introduction
Simple programs can make a big difference! An XBee running small amounts of code can perform some pretty important tasks. Cryptic readings can be transformed into useful data, excess transmissions can be intelligently filtered out, modern sensors and actuators can be employed directly, operational logic can glue inputs and outputs together in an intelligent way.
Here are some useful MicroPython examples that should run within 12KB of RAM, useful even in a small sandboxed implementation. Required parts and a method for simulating limited RAM are noted below.
Examples
Send “Hello World”
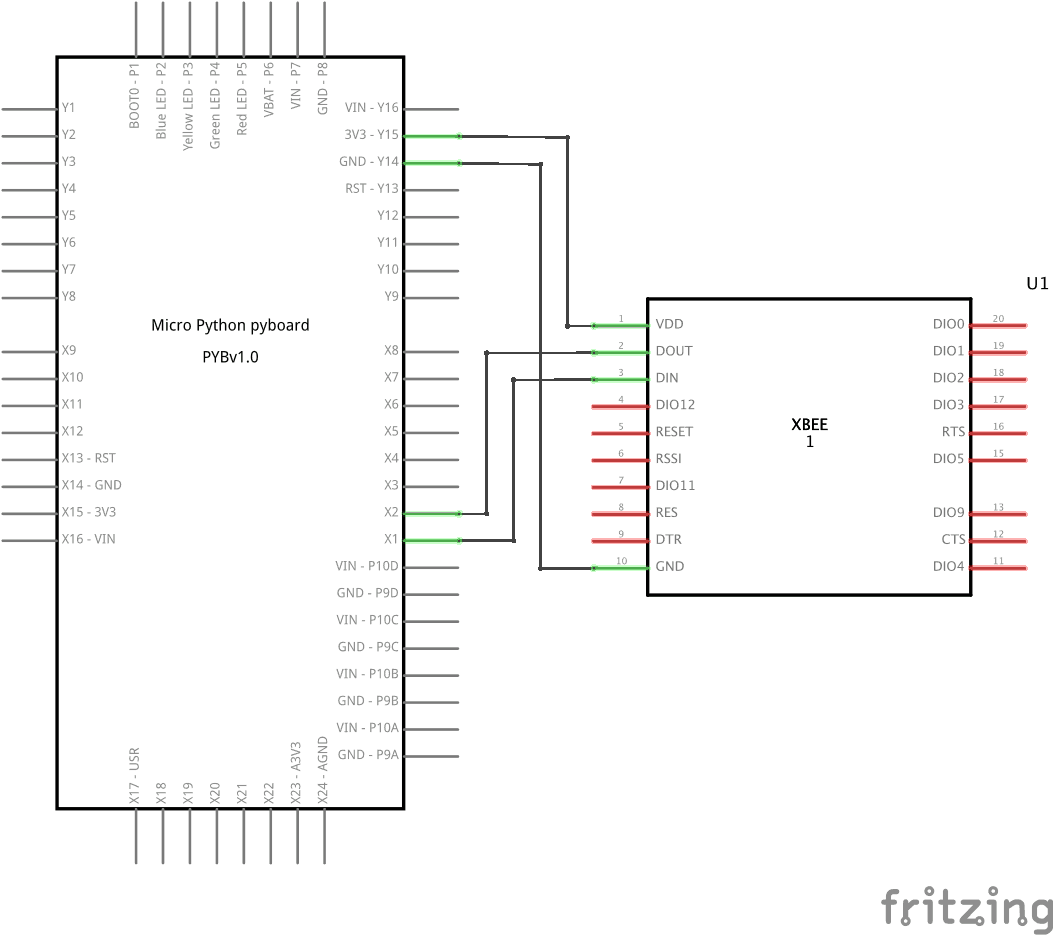
This example shows how to send some text data via an XBee in transparent mode.
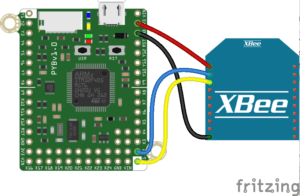
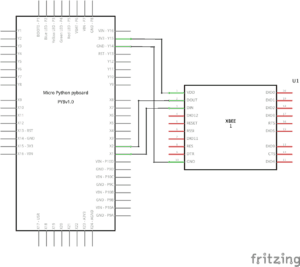
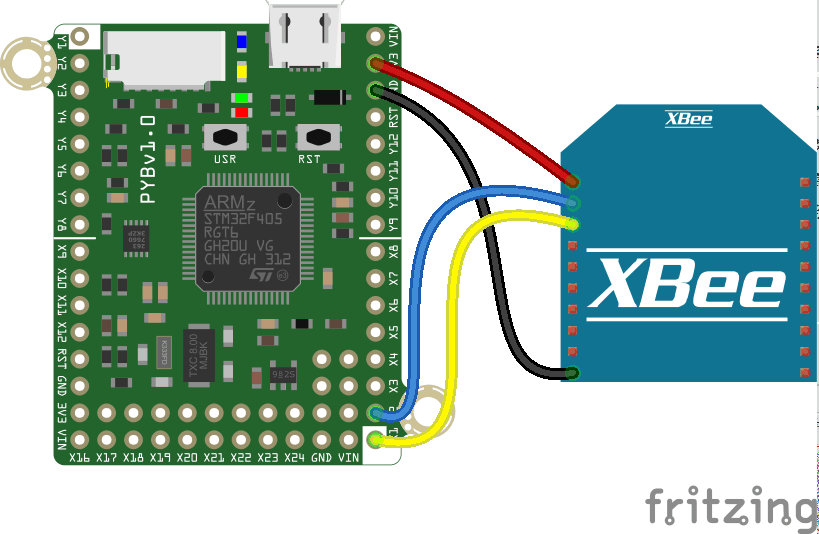
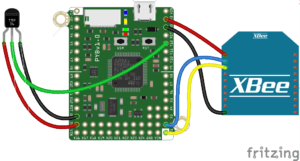
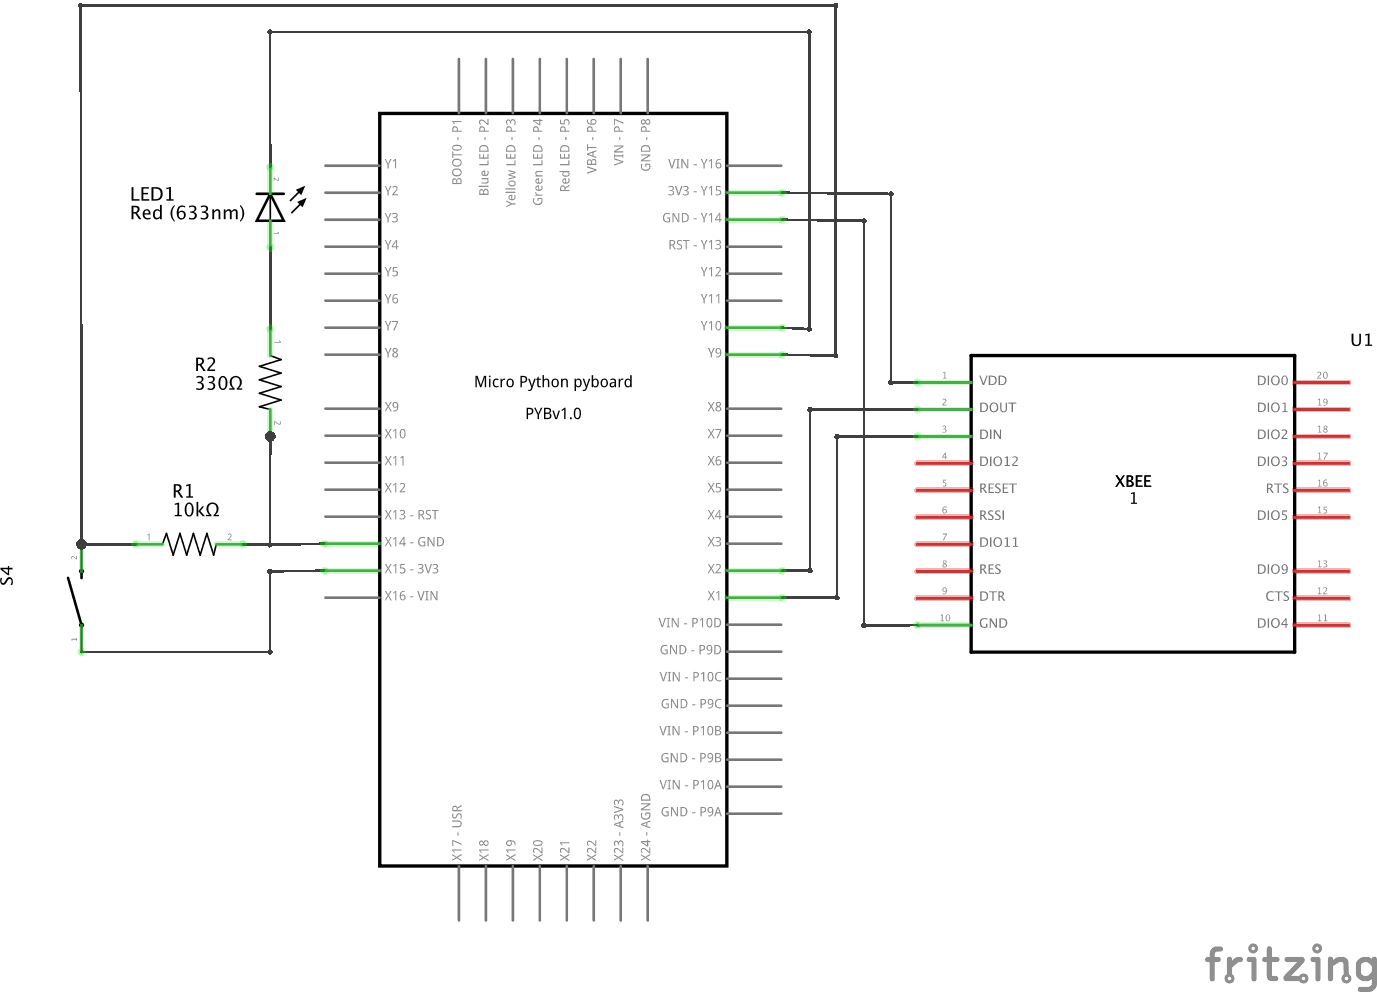
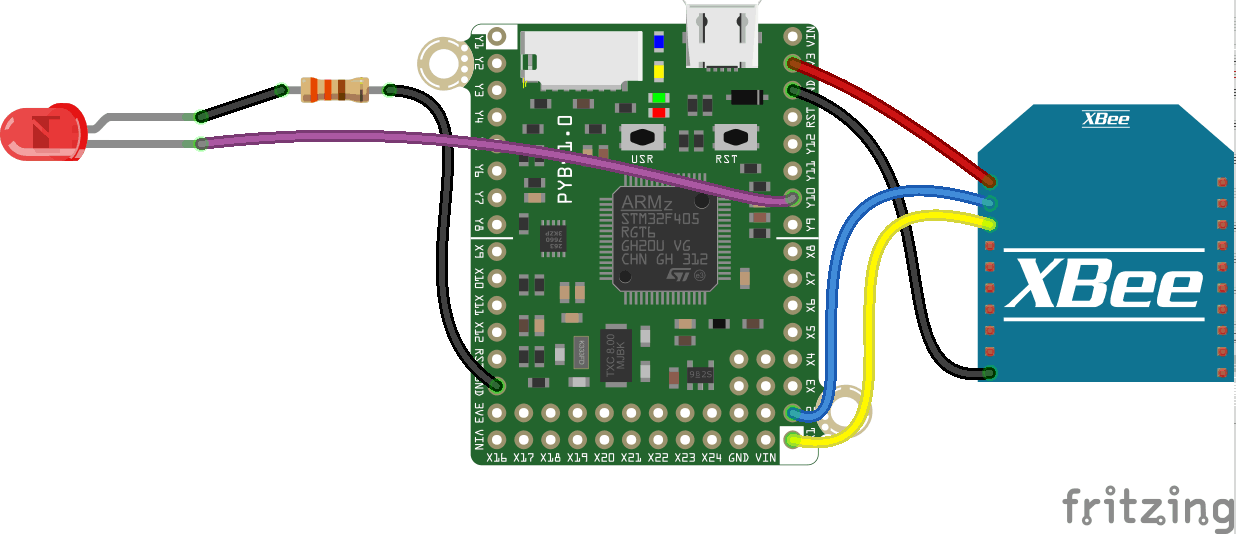
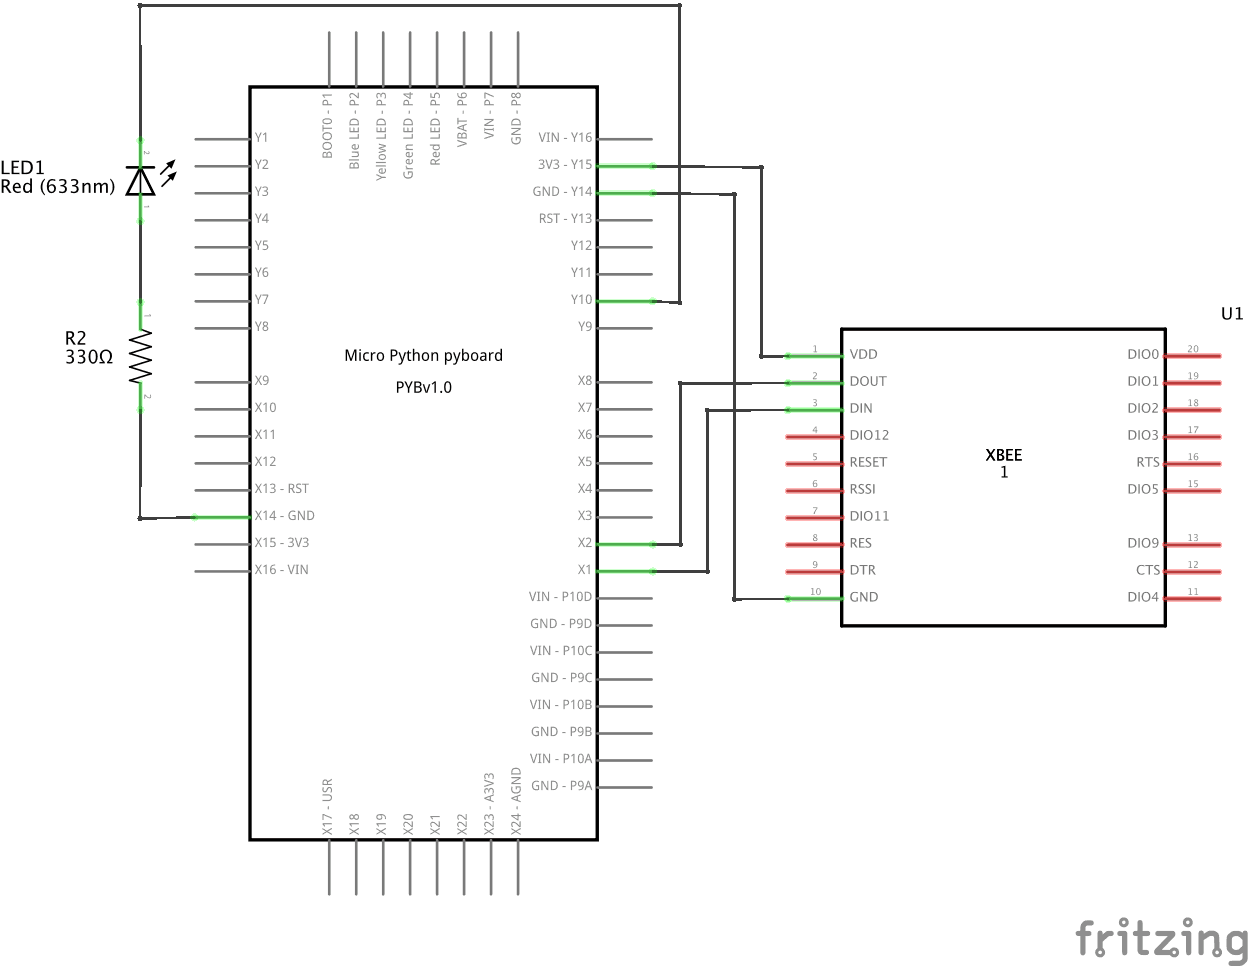
- SETUP: Connect the XBee (configured to factory defaults) as shown in the diagram below:
- PROGRAM: Load the code sample into your pyboard’s main.py file
# main.py -- Send Text Example v1.0 - XBee MicroPython
from pyb import UART # load UART resources
uart = UART(4, baudrate=9600) # create UART object on X1, X2
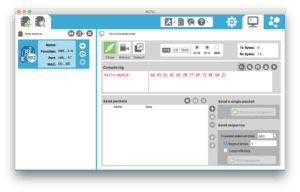
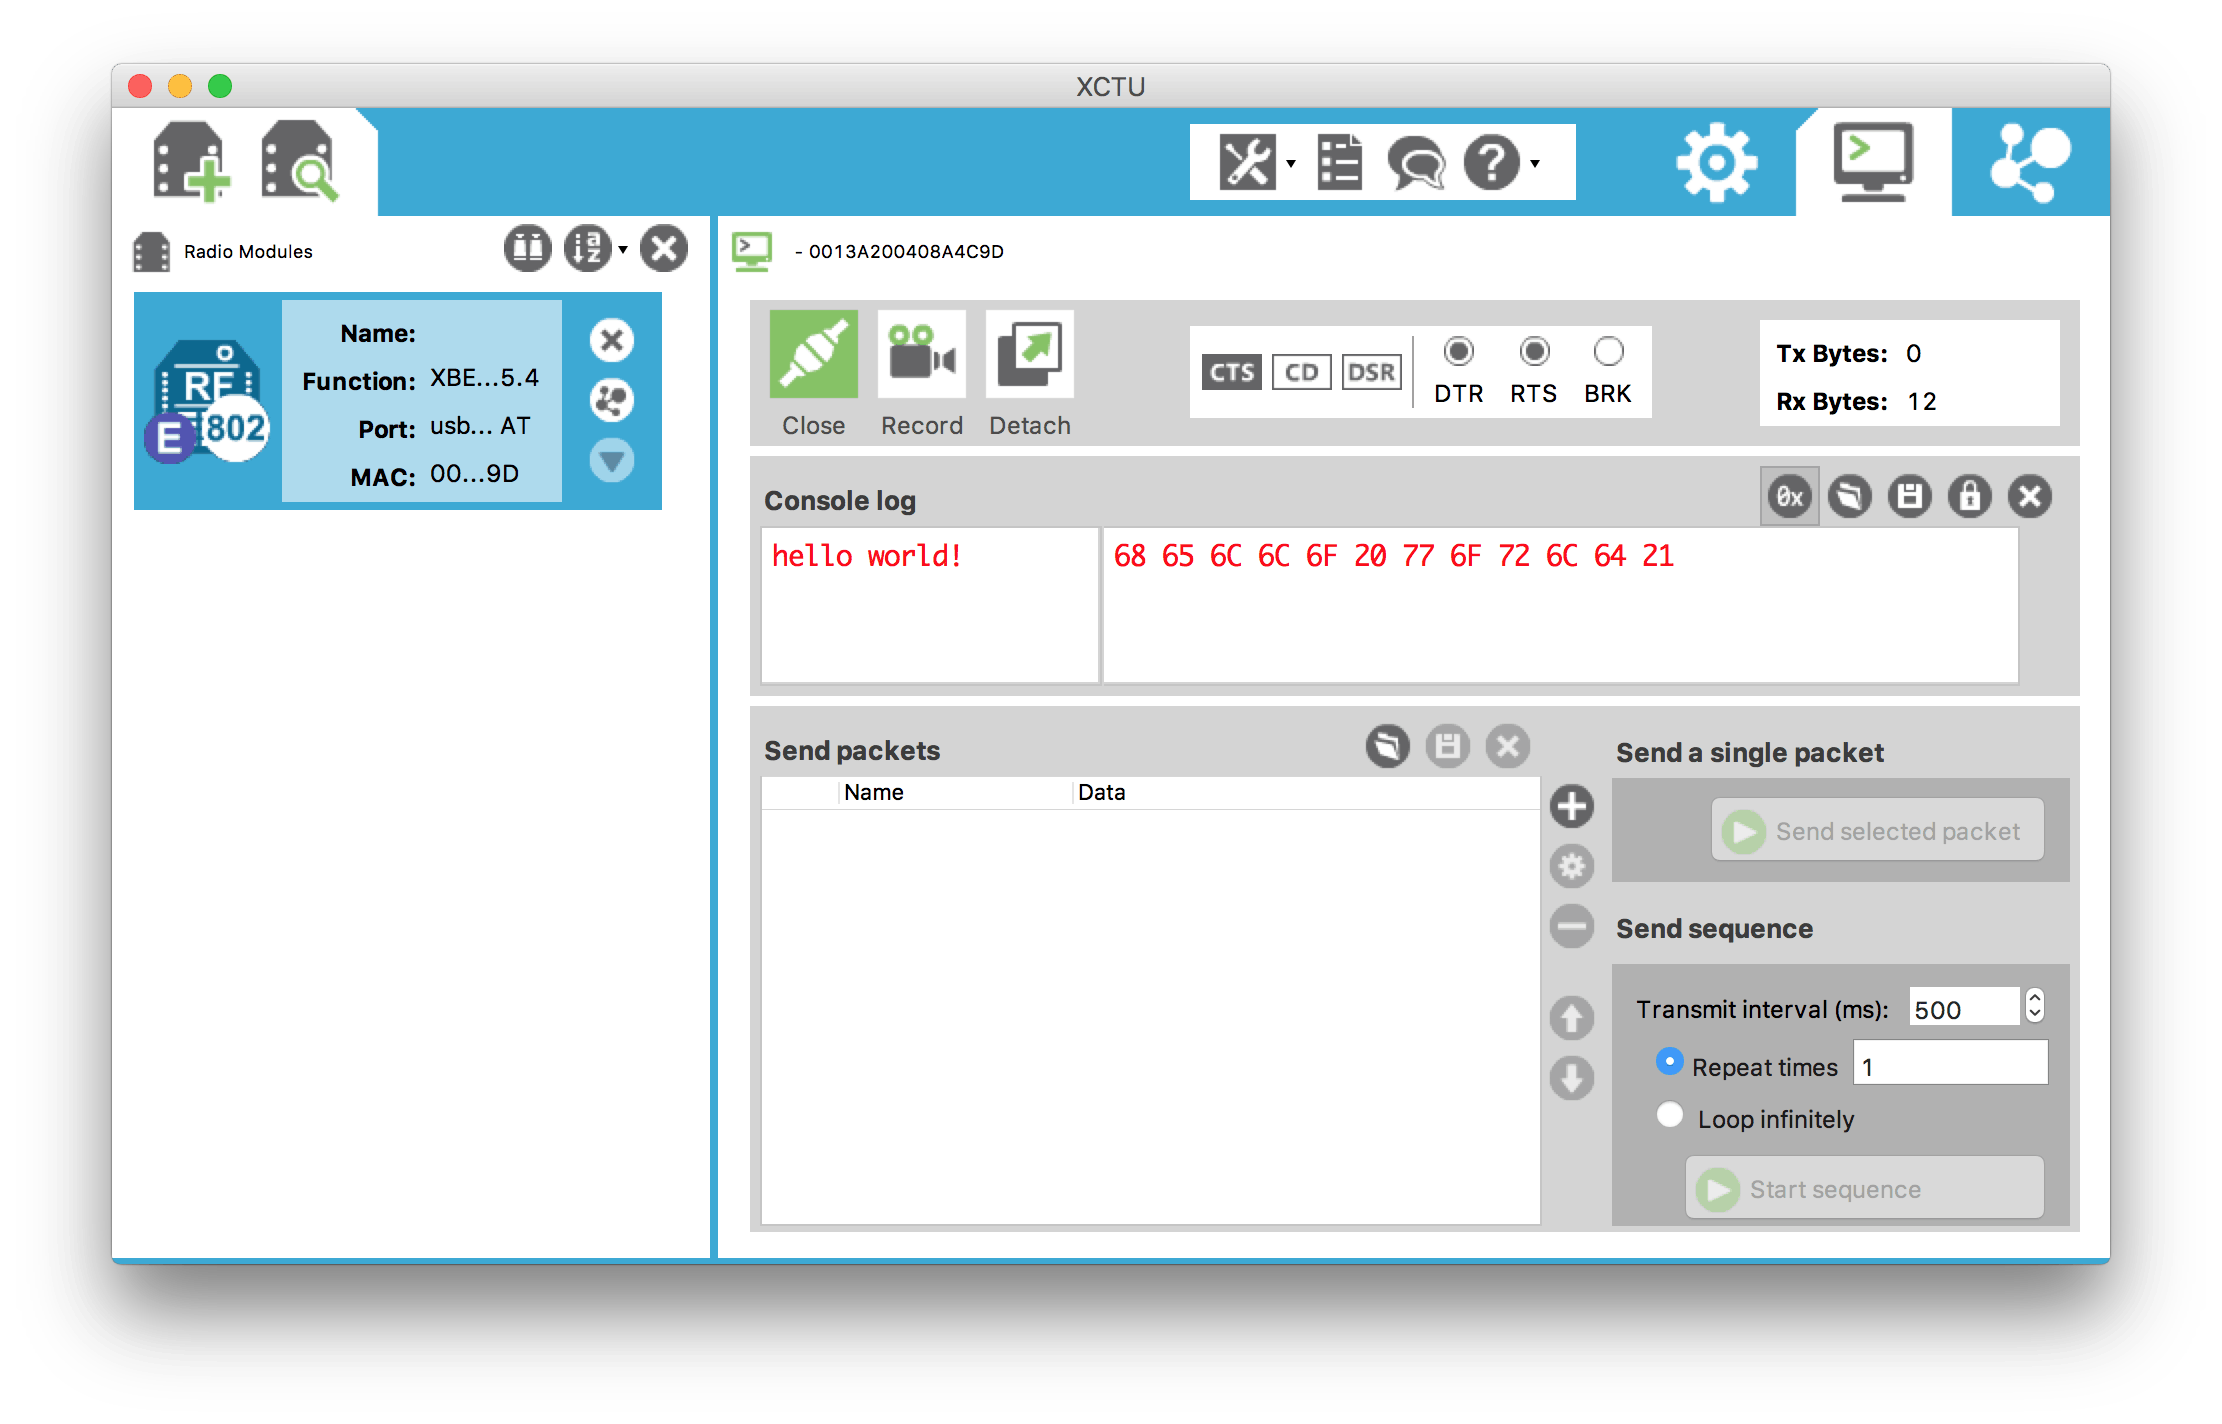
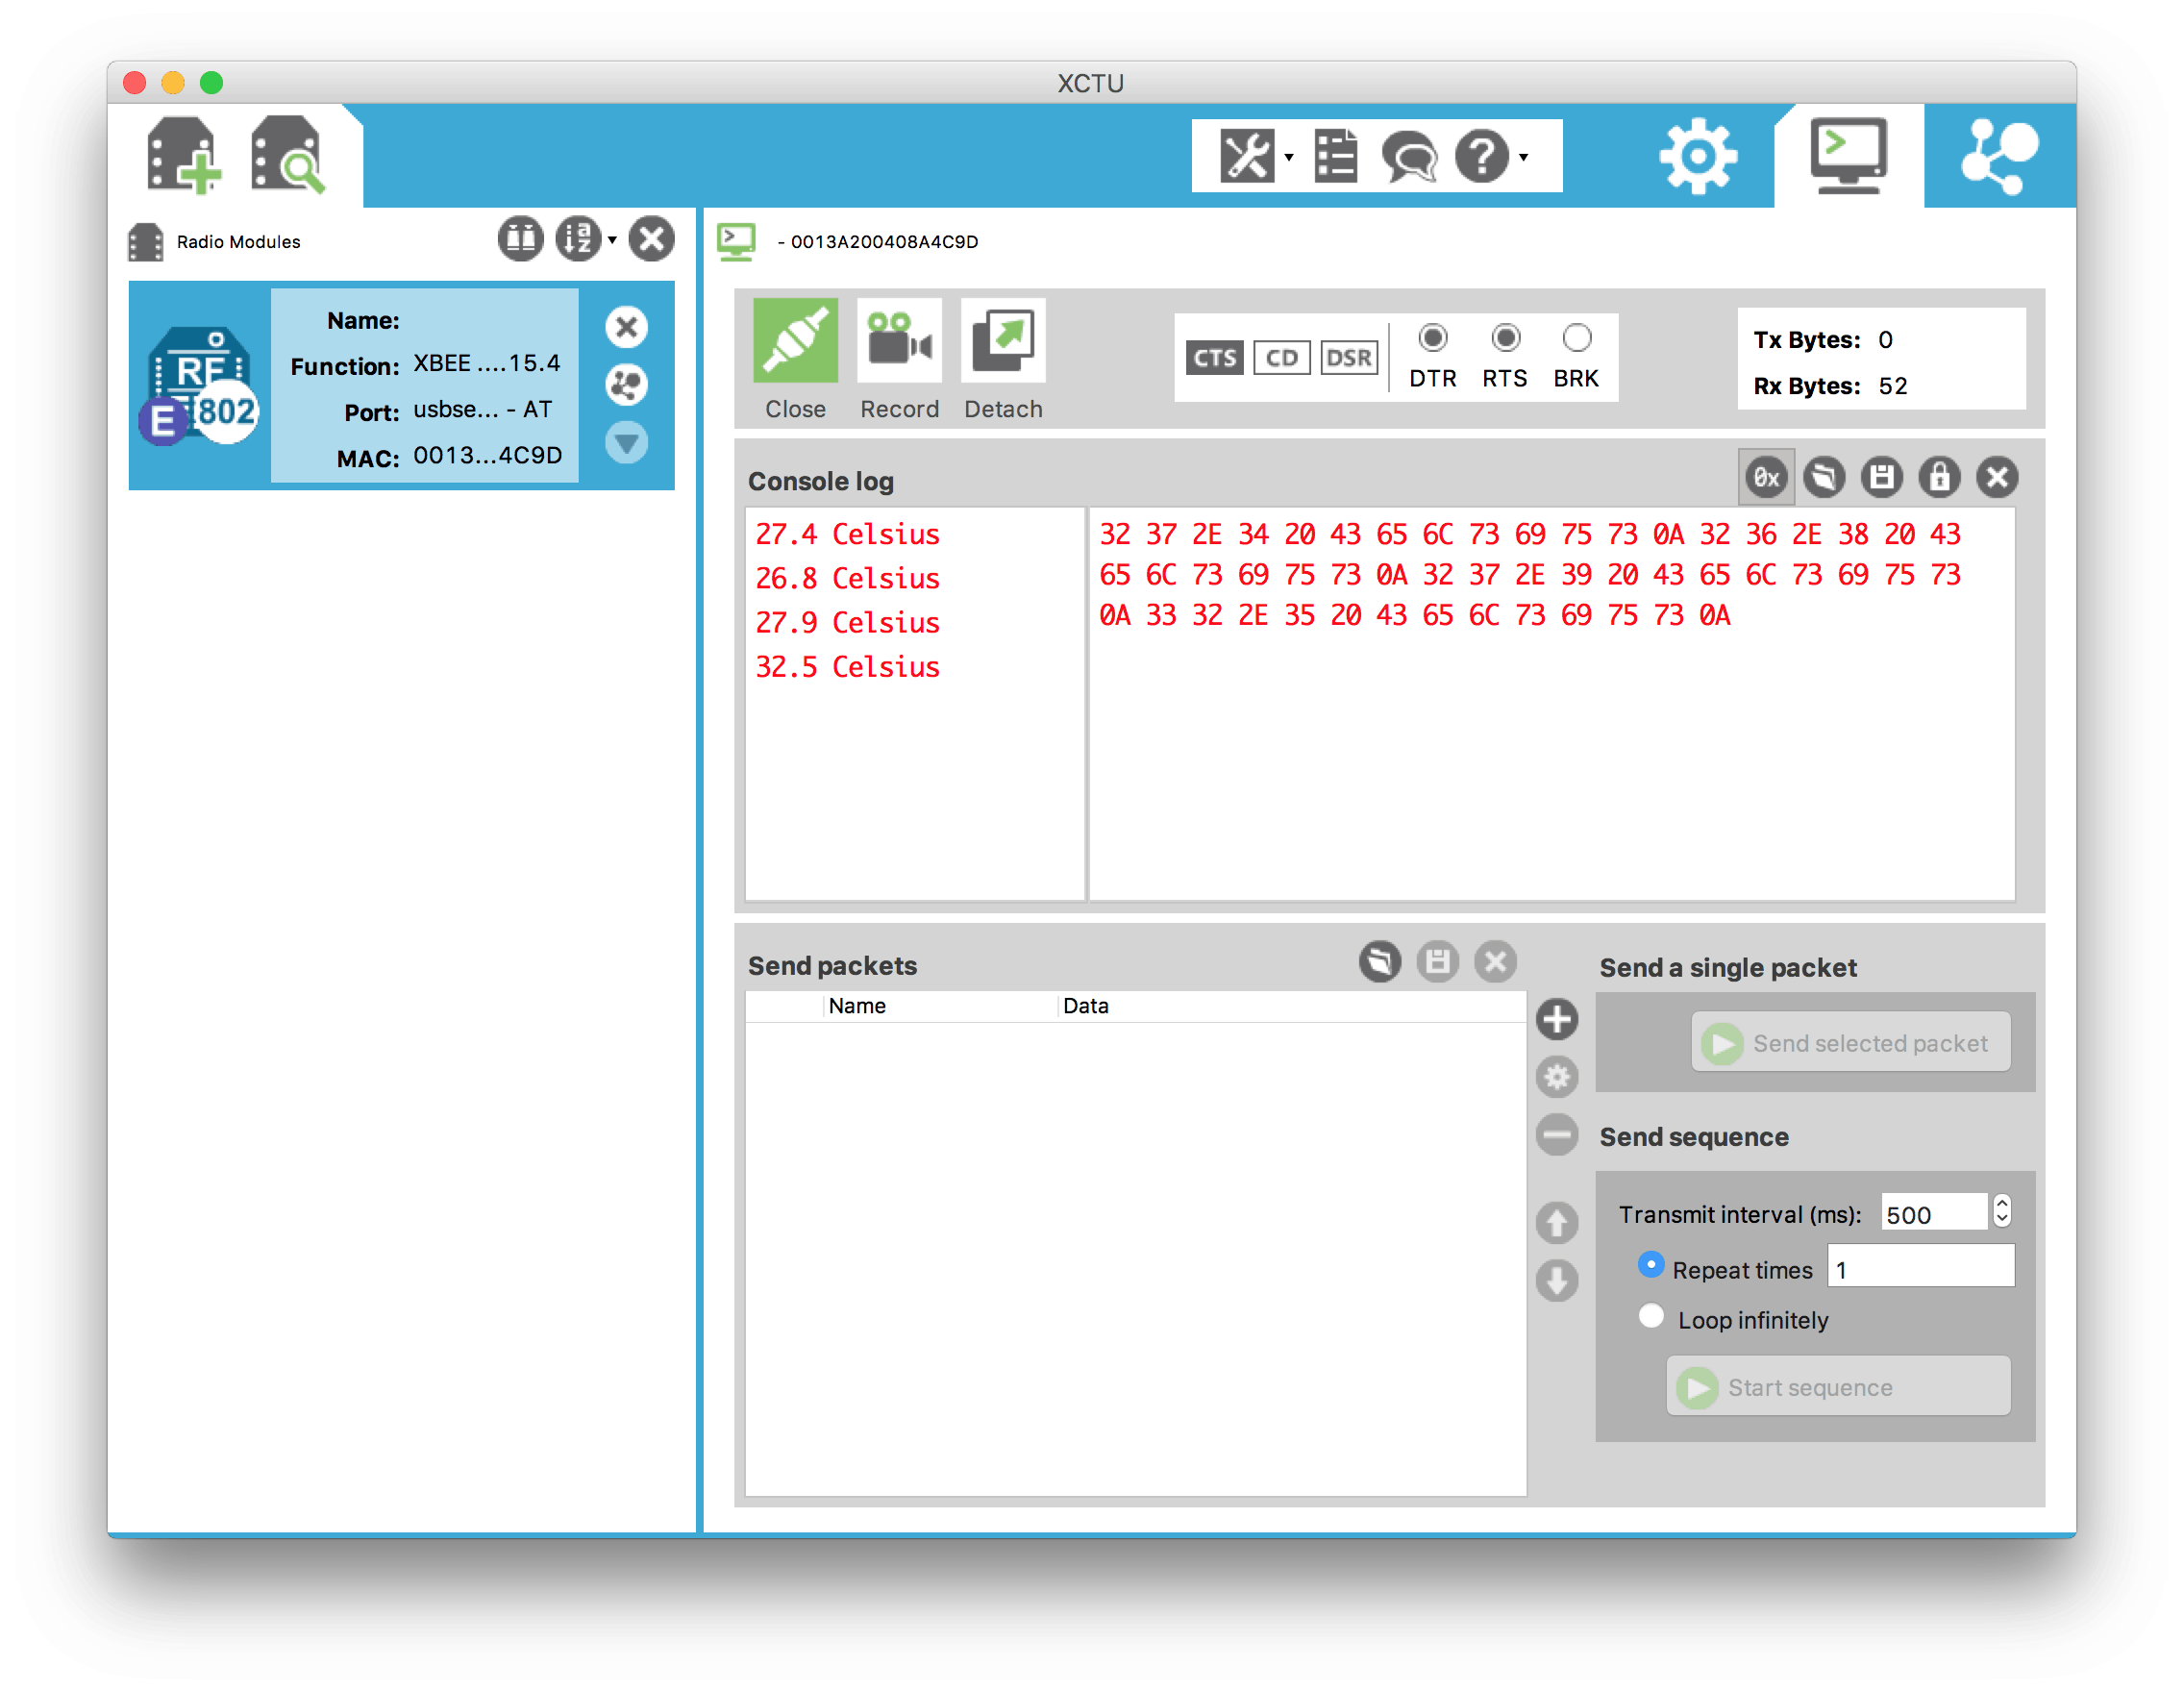
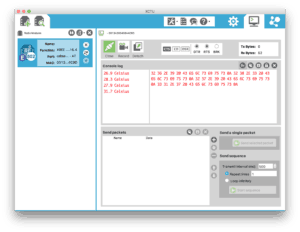
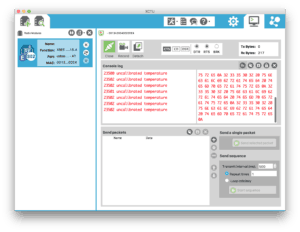
uart.write('hello world!') # write data - RESULTS: Connect a second XBee, also configured to factory defaults, to your computer. Then use a terminal program like XCTU or CoolTerm to receive the text data. Each time you reset the pyboard, it sends “hello world!” one time to your computer. The results will look like this:
Read, Transform and Send Value
This example shows how to read a sensor, transform that data into correct units, then send via an XBee in transparent mode.
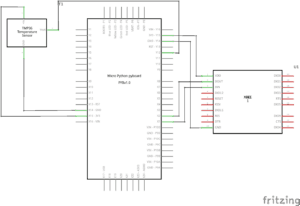
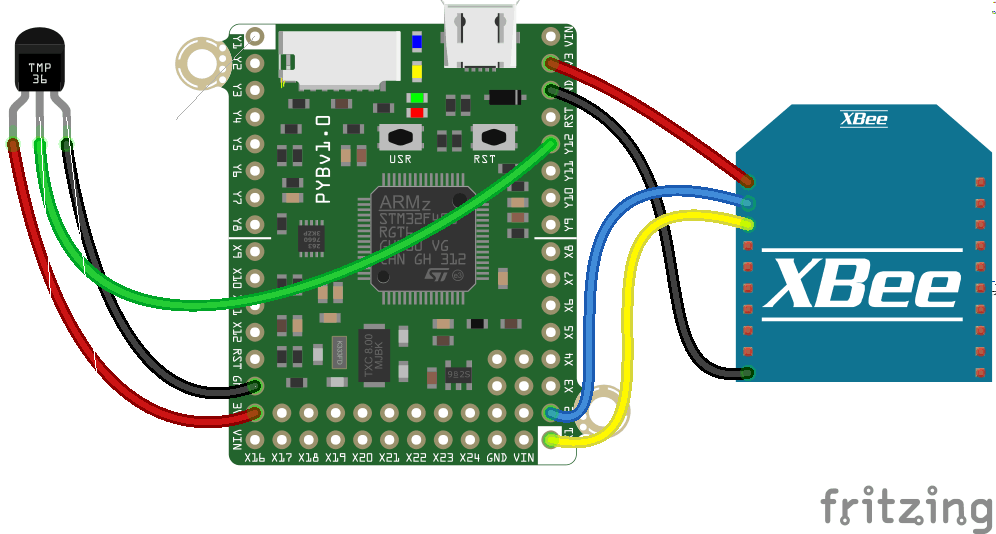
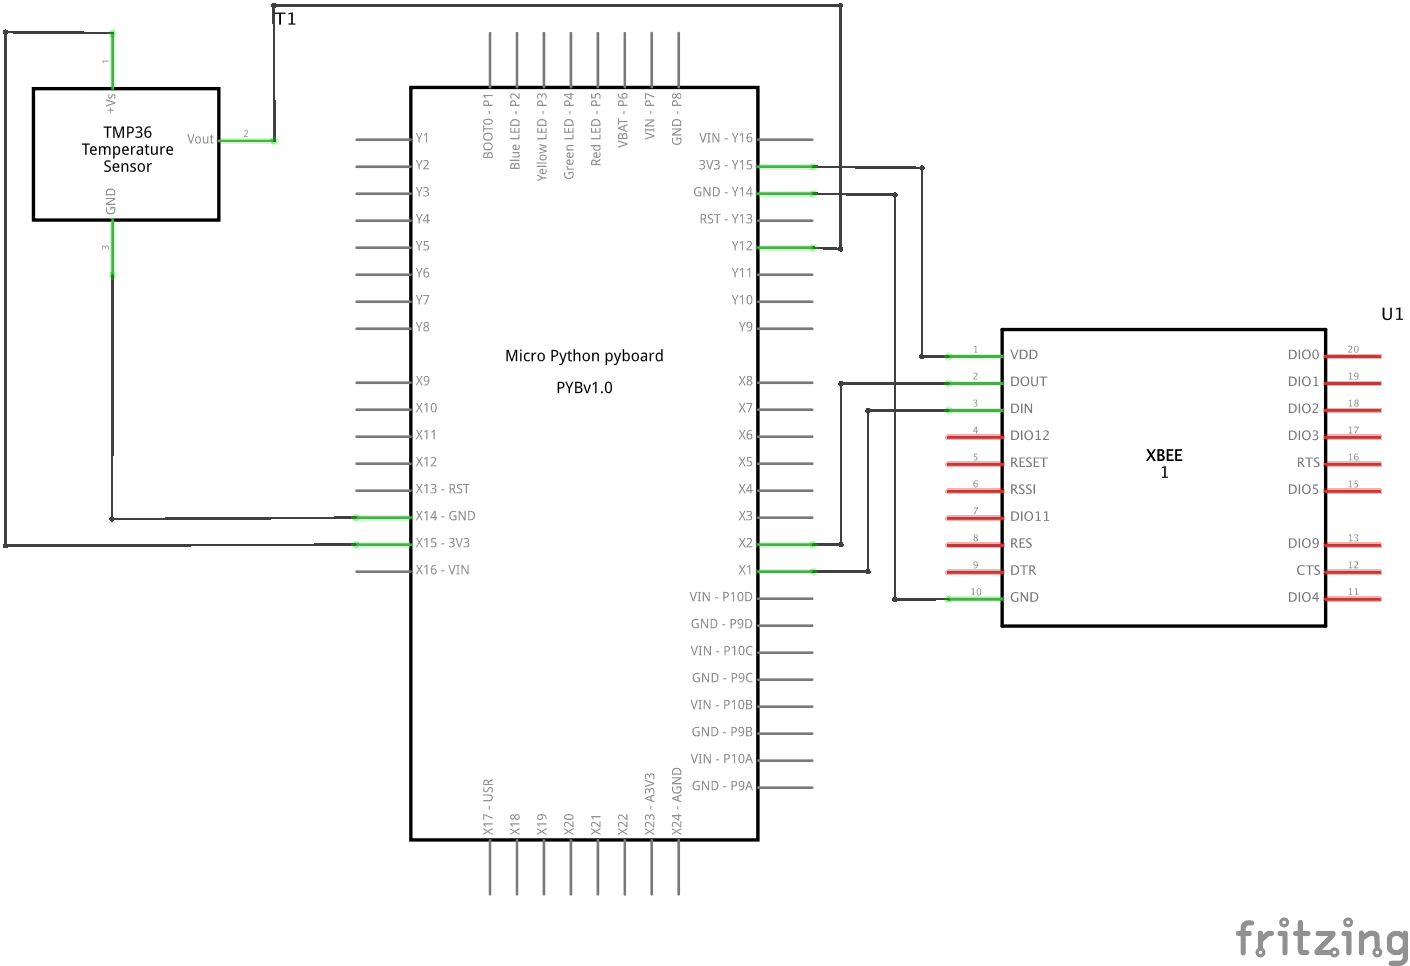
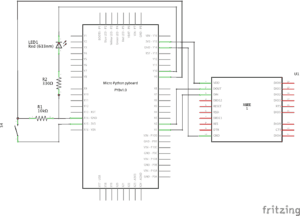
- SETUP: Connect the XBee (configured to factory defaults) and a TMP36 temperature sensor as shown in the diagram below. You can use the XBee pyboard skin to easily connect the radio module, and a small breadboard connected with jumper wires for the TMP36.
- PROGRAM: Load the code sample into your pyboard’s main.py file
# main.py -- Read Transform Send v1.0 - XBee MicroPython
from pyb import Pin, ADC, UART # load resources
uart = UART(4, baudrate=9600) # create UART object on X1, X2
pin = ADC(Pin('Y12')) # configure Y12 for ADC
while True: # loop continuously
temp = (int((pin.read() * (3300/4096)) - 500) / 10) # read analog TMP36 and transform
uart.write(str(temp)) # write data
uart.write(' Celsius\n') # write text label
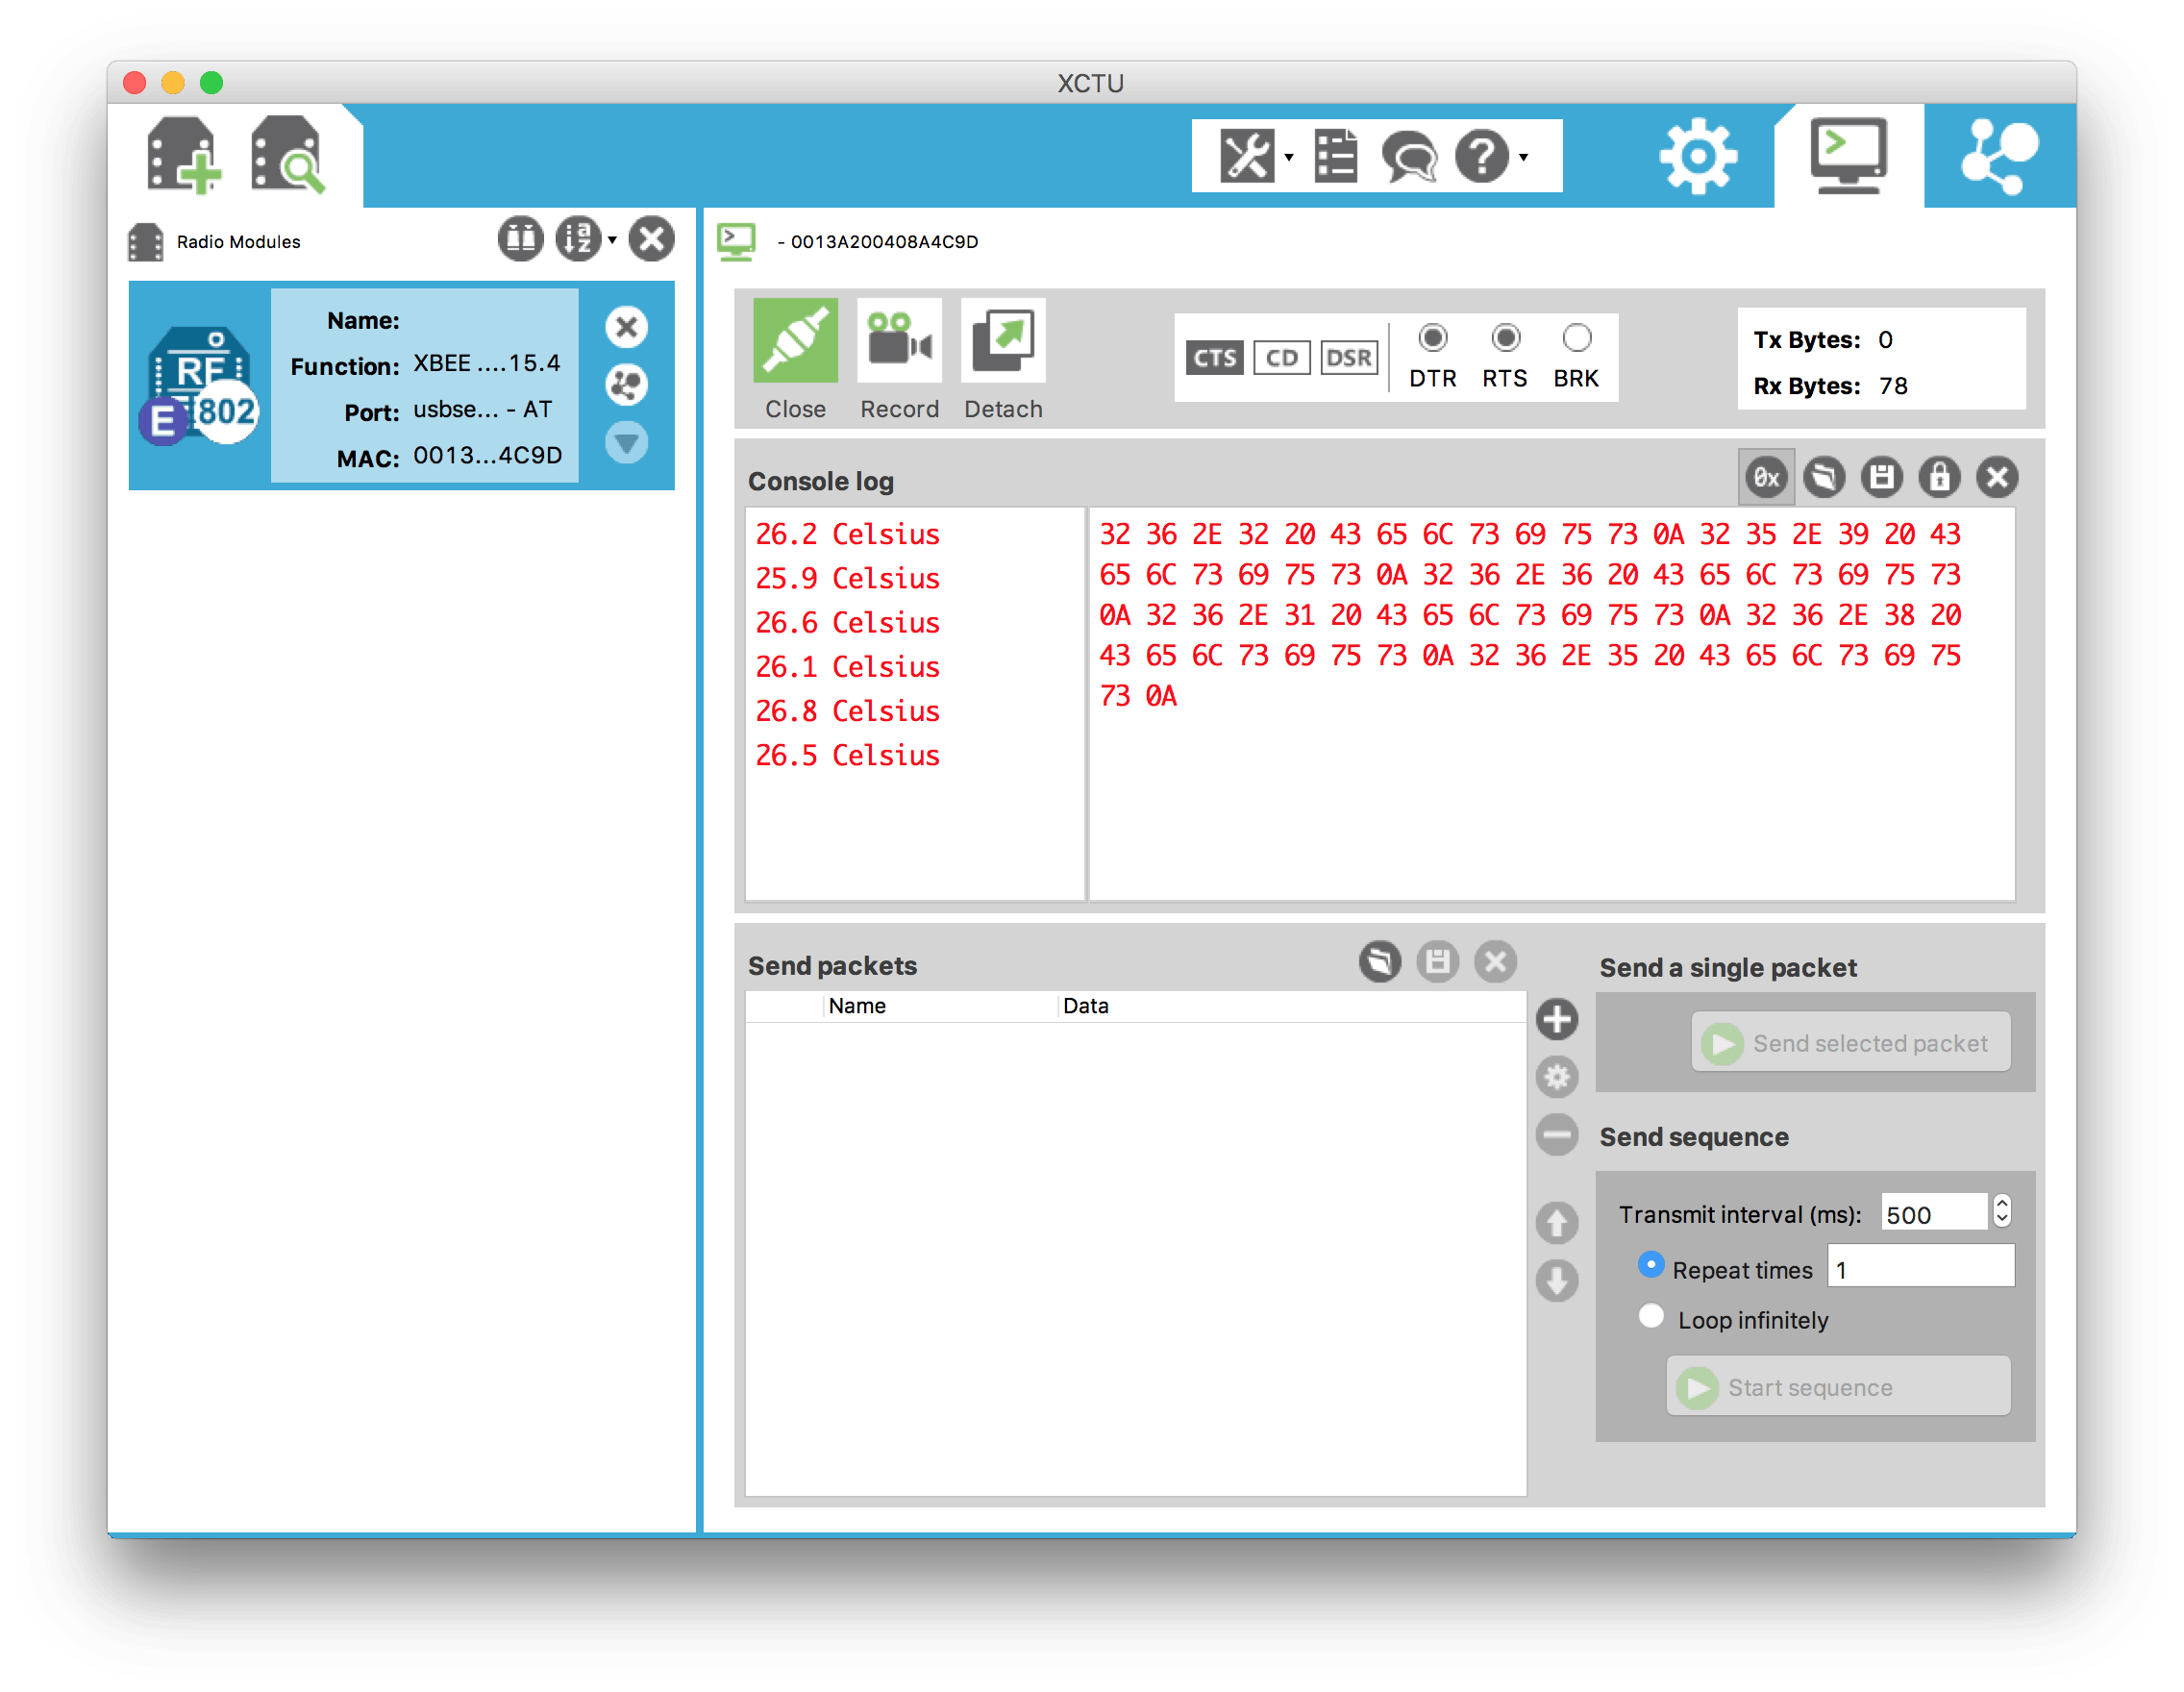
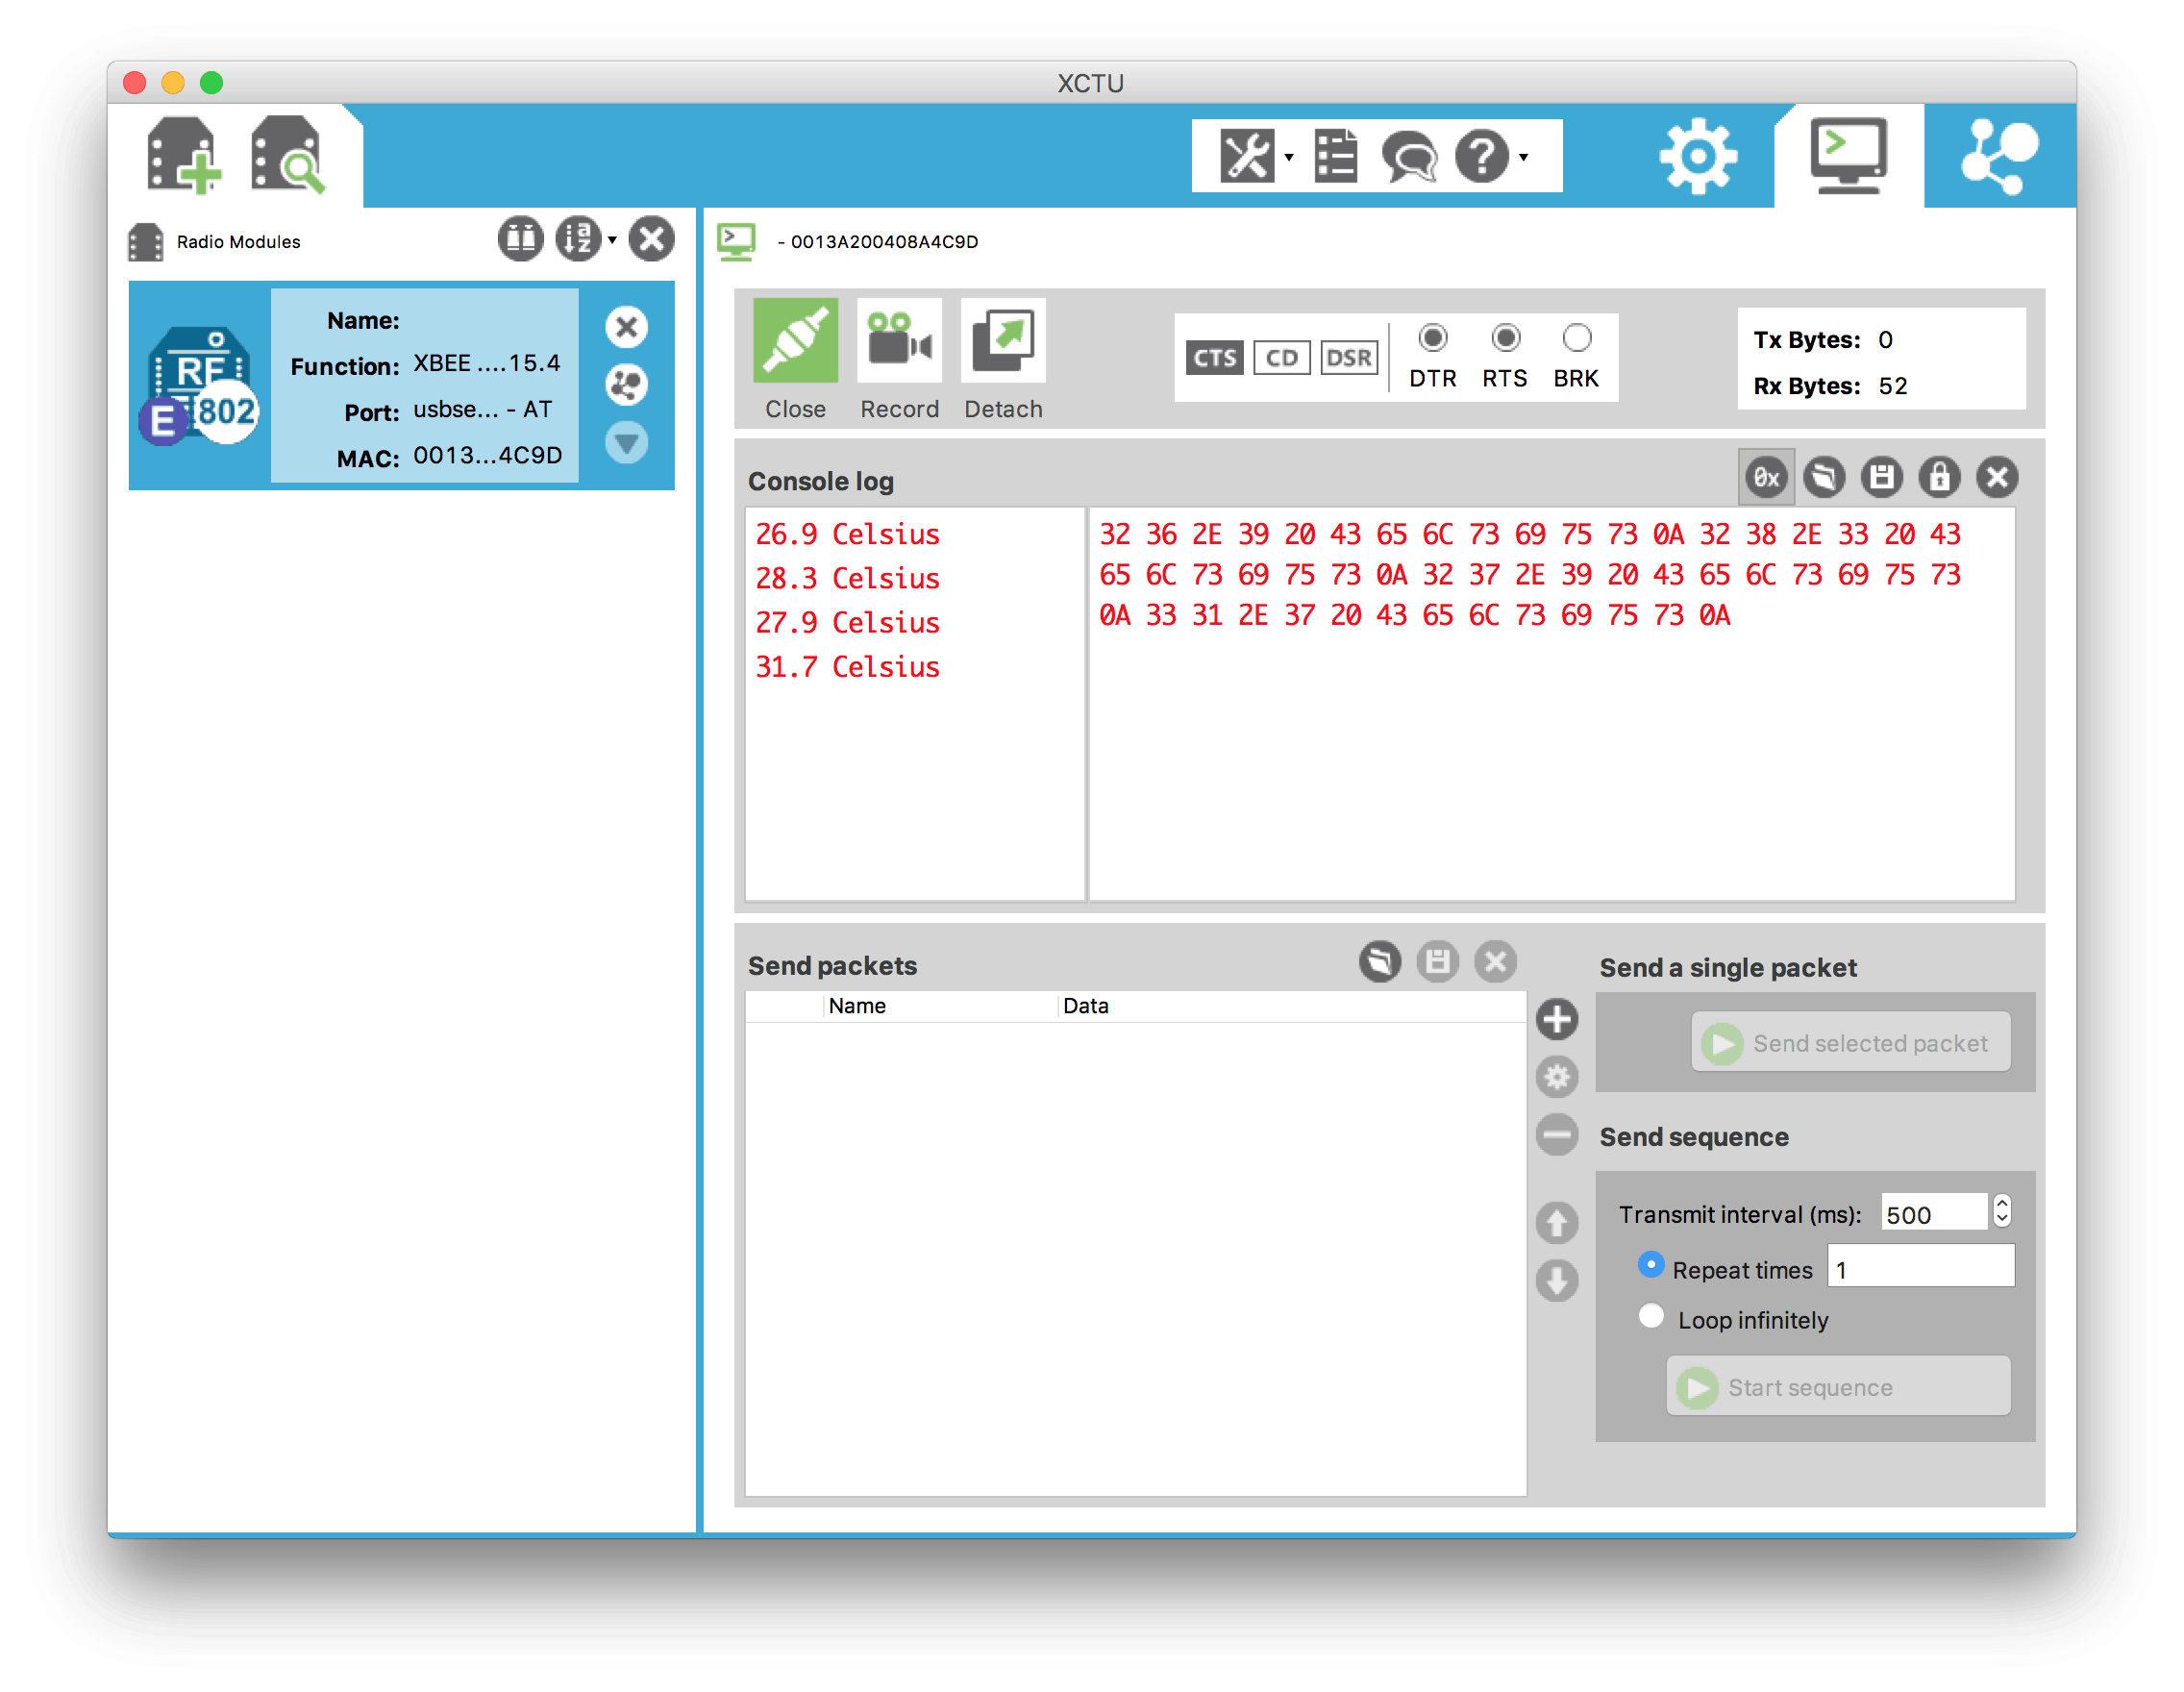
pyb.delay(2000) # wait two seconds - RESULTS: Connect a second XBee, also configured to factory defaults, to your computer. Then use a terminal program like XCTU or CoolTerm to receive the sensor data. The results will look like this:

Read, Transform and Send Only High Sensor Values
This example shows how to read a sensor, filter out low values, then send via an XBee in transparent mode.
- SETUP: Use the basic sensing setup.
- PROGRAM: Load the code sample into your pyboard’s main.py file
# main.py -- Read Transform Send High Values v1.0 - XBee MicroPython
from pyb import Pin, ADC, UART        # load resources
uart = UART(4, baudrate=9600)         # create UART object on X1, X2
pin = ADC(Pin('Y12'))                 # configure Y12 for ADC
while True:                           # loop continuously
    temp = (int((pin.read() * (3300/4096)) - 500) / 10) # read analog TMP36 and transform
    if (temp > 30):                      # only send high readings
        uart.write(str(temp))               # write data
        uart.write(' Celsius\n')            # write text label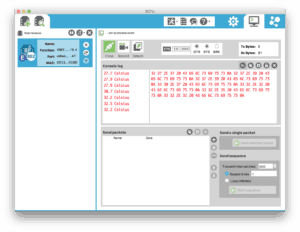
pyb.delay(2000) # wait two seconds - RESULTS: Connect a second XBee, also configured to factory defaults, to your computer. Then use a terminal program like XCTU or CoolTerm to receive the sensor data. The results will show ONLY readings above the limit of 30 Celsius, no other data will be displayed:


Read, Transform and Send Only High or Low Values
This example shows how to read a sensor, filter out mid-range values, then send any high or low values via an XBee in transparent mode.
- SETUP: Use the basic sensing setup.
- PROGRAM: Load the code sample into your pyboard’s main.py file
# main.py -- Read Transform Send High or Low v1.0 - XBee MicroPython
from pyb import Pin, ADC, UART        # load resources
uart = UART(4, baudrate=9600)         # create UART object on X1, X2
pin = ADC(Pin('Y12'))                 # configure Y12 for ADC
while True:                           # loop continuously
    temp = (int((pin.read() * (3300/4096)) - 500) / 10) # read analog TMP36 and transform
    if (temp > 30 or temp < 28):         # only send high or low readings
        uart.write(str(temp))                # write data
        uart.write(' Celsius\n')             # write text label
pyb.delay(2000) # wait two seconds - RESULTS: Connect a second XBee, also configured to factory defaults, to your computer. Then use a terminal program like XCTU or CoolTerm to receive the sensor data. The results will show ONLY readings below 28 Celsius or above 30 Celsius, no other data will be displayed:

Send “Heartbeat” Sensor Data
This example shows how to send periodic “heartbeat” data values via an XBee in transparent mode. Used with filters or alarms to confirm normal operation.
- SETUP: Use the basic sensing setup.
- PROGRAM: Load the code sample into your pyboard’s main.py file
# main.py -- Send Heartbeat Data v1.0 - XBee MicroPython
from pyb import Pin, ADC, UART        # load resources
uart = UART(4, baudrate=9600)         # create UART object on X1, X2
pin = ADC(Pin('Y12'))                 # configure Y12 for ADC
last_reading = 0                      # take first reading right away
while True: # loop continuously
    temp = (int((pin.read() * (3300/4096)) - 500) / 10) # read analog TMP36 and transform
    if (pyb.millis() > last_reading):    # only send data periodically
        last_reading = pyb.millis() + 60000  # schedule next reading for one minute later
        uart.write(str(temp))                # write data
uart.write(' Celsius\n') # write text label - RESULTS: Connect a second XBee, also configured to factory defaults, to your computer. Then use a terminal program like XCTU or CoolTerm to receive the sensor data. The results will show data readings once per minute, though in typical use it might be set to daily or even weekly.

Send “Heartbeat” with Min and Max
This example shows how to send periodic “heartbeat” data values with min and max for the period, via an XBee in transparent mode.
- SETUP: Use the basic sensing setup.
- PROGRAM: Load the code sample into your pyboard’s main.py file
# main.py -- Send Heartbeat with Min and Max v1.0 - XBee MicroPython
from pyb import Pin, ADC, UART       # load resources
uart = UART(4, baudrate=9600)        # create UART object on X1, X2
pin = ADC(Pin('Y12'))                # configure Y12 for ADC
last_reading = 0                     # take first reading right away
while True:                          # loop continuously
    temp = (int((pin.read() * (3300/4096)) - 500) / 10) # read analog TMP36 and transform
    try:
        if (max_temp <= temp): max_temp = temp # keep max up-to-date
        if (min_temp >= temp): min_temp = temp # keep min up-to-date
    except NameError:                   # if variables don't exist...
        max_temp = min_temp = temp          # ...reset min and max
    if (pyb.millis() > last_reading):   # only send data periodically
        last_reading = pyb.millis() + 60000 # schedule next reading for one minute later
        uart.write(str(temp))               # write data
        uart.write(' Celsius now\n')        # write text label
        uart.write(str(min_temp))           # write min data
        uart.write(' Celsius min\n')        # write text label
        uart.write(str(max_temp))           # write max data
        uart.write(' Celsius max\n')        # write text label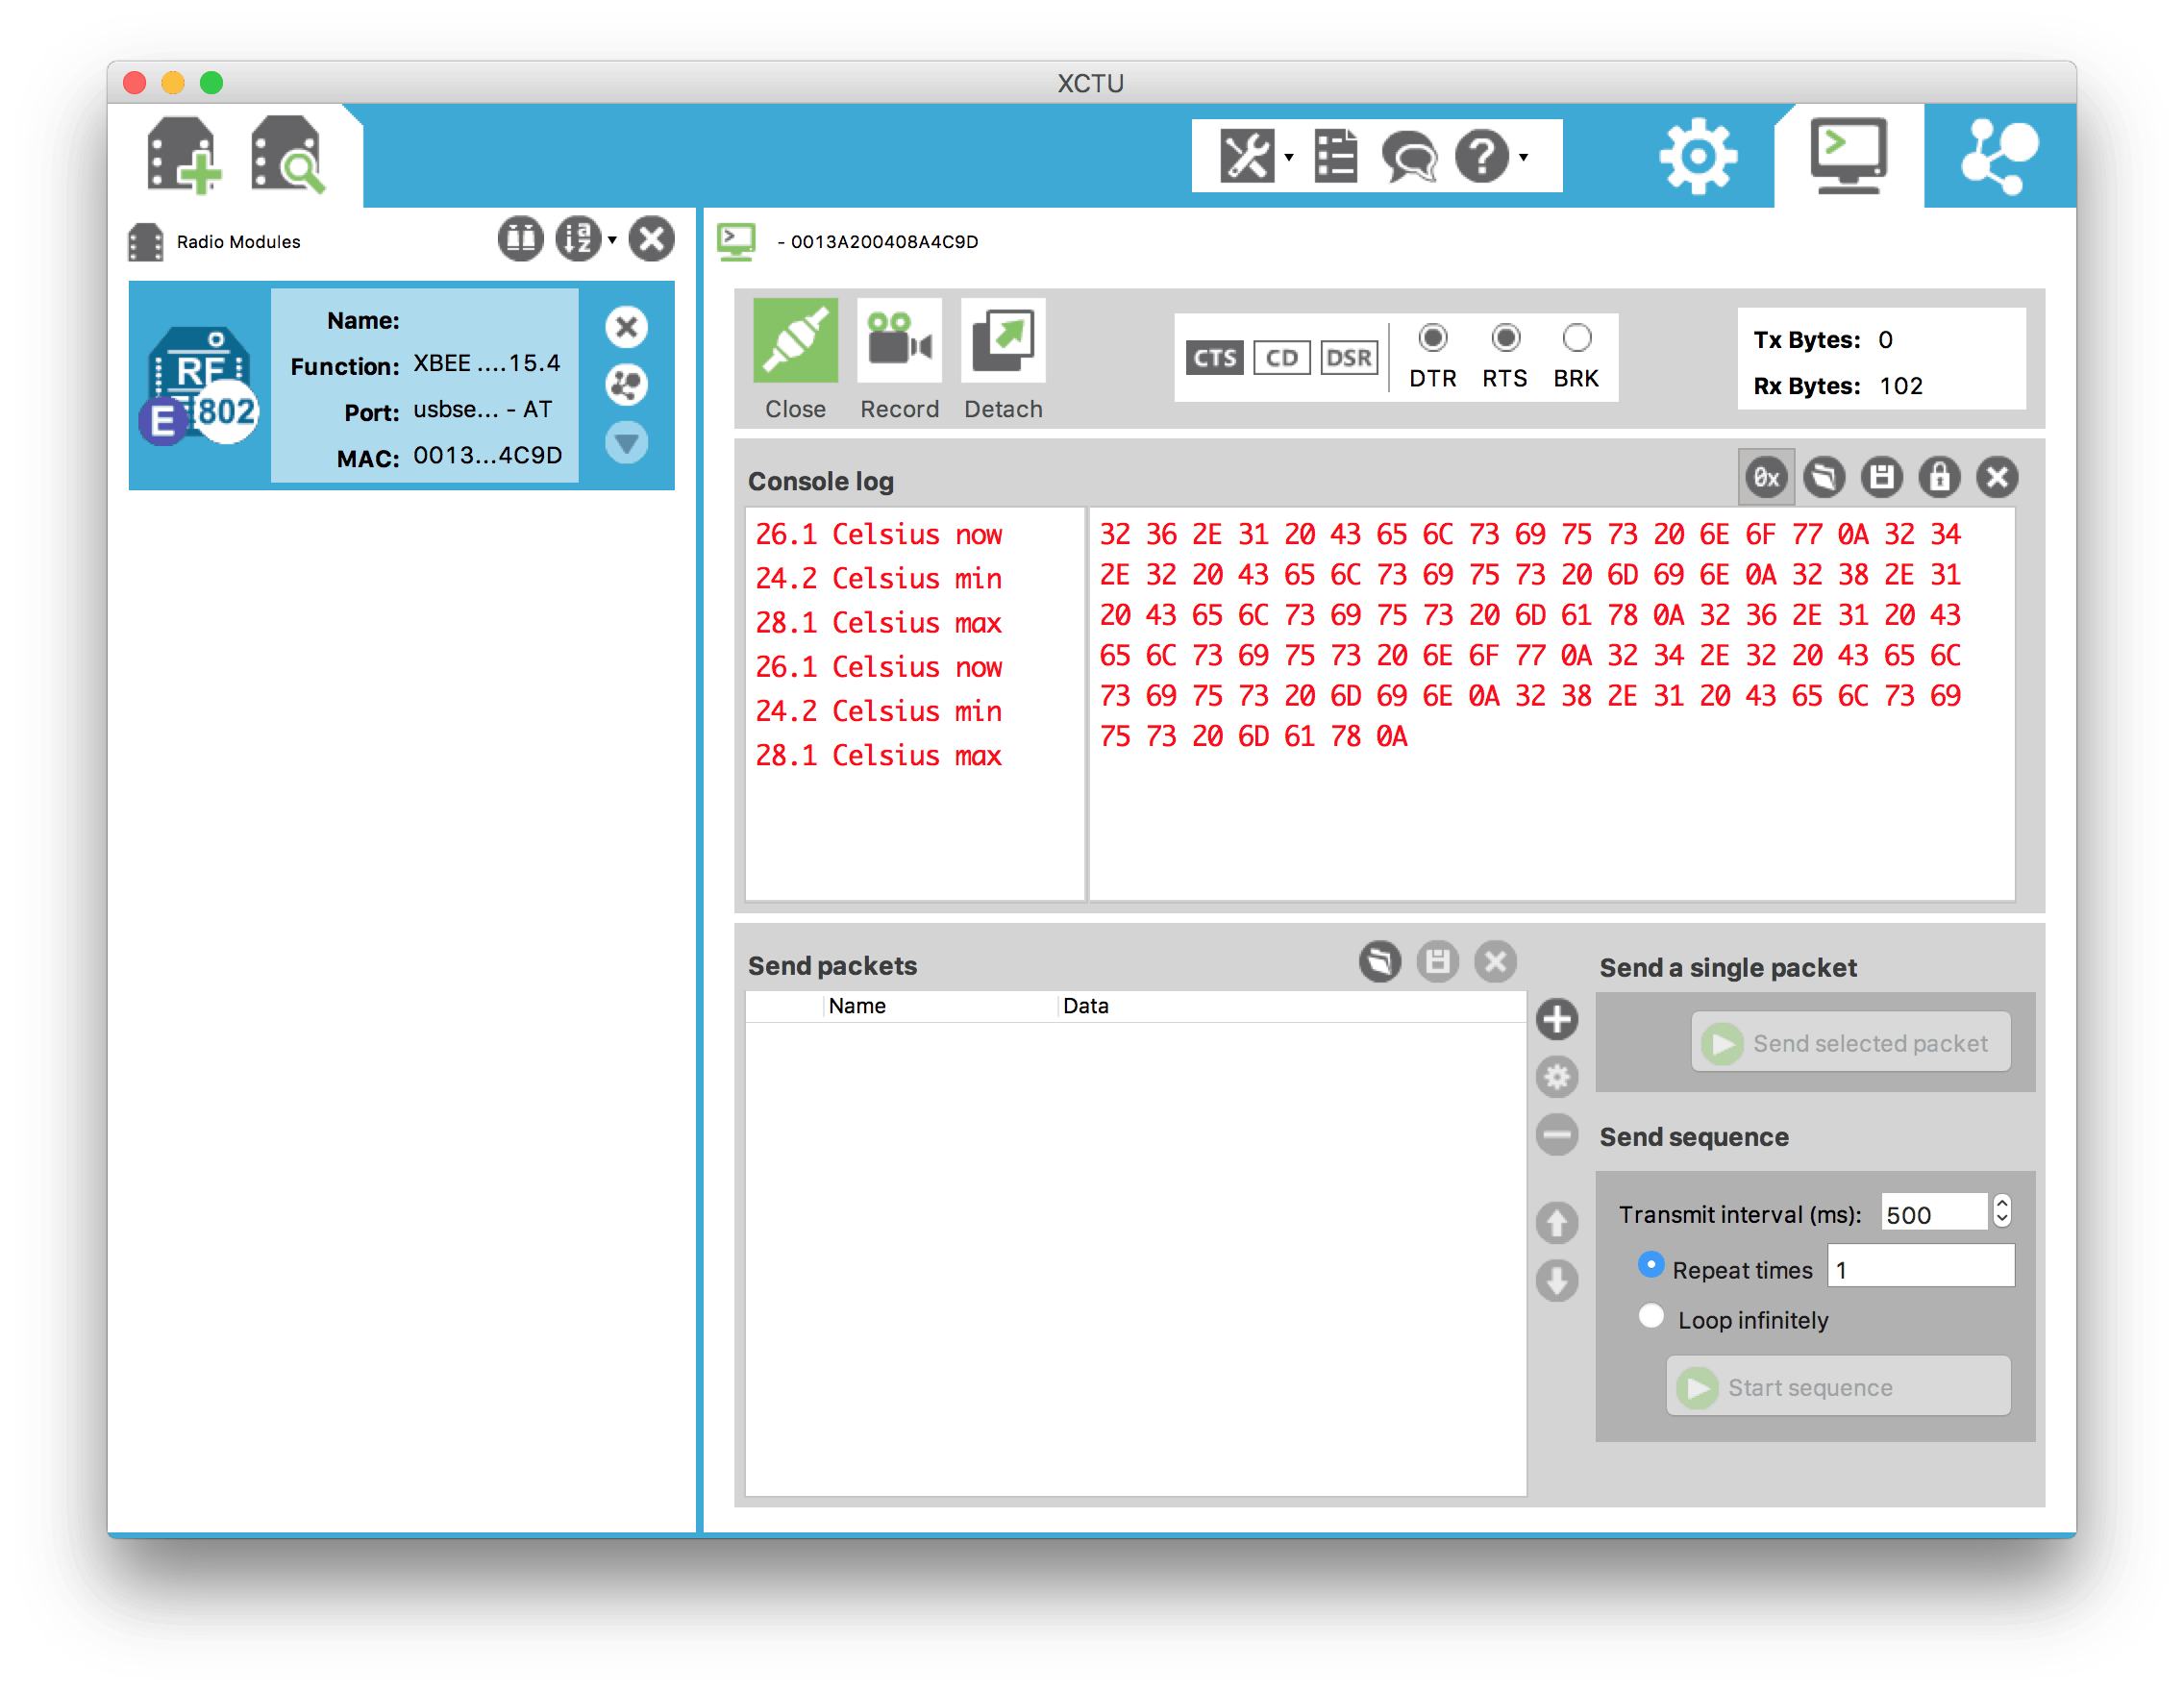
del max_temp, min_temp # delete min and max for next run - RESULTS: Connect a second XBee, also configured to factory defaults, to your computer. Then use a terminal program like XCTU or CoolTerm to receive the sensor data. The results will show data readings once per minute, with the minimum and maximum values during that period.

Aggregate 10 Samples Then Send Batch
This example shows how to aggregate data before sending in a batch, via an XBee in transparent mode.
- SETUP: Use the basic sensing setup.
- PROGRAM: Load the code sample into your pyboard’s main.py file
# main.py -- Aggregate Then Send 10 Values v1.0 - XBee MicroPython
from pyb import Pin, ADC, UART     # load resources
uart = UART(4, baudrate=9600)      # create UART object on X1, X2
pin = ADC(Pin('Y12'))              # configure Y12 for ADC
period = 60000                     # length between sends
samples = 10                       # number of samples in a send
while True:                        # loop continuously
    readings=[]                       # create a list to store readings
    for i in range(samples):          # sample the right number of times
        temp = (int((pin.read() * (3300/4096)) - 500) / 10) # read analog TMP36 and transform
        readings.append(temp)             # put the sample in the list
        pyb.delay(int(period/samples))    # wait until the next sample
    for value in readings:            # iterate through the list
        uart.write(str(value))            # write data
        uart.write(' Celsius\n')          # write text label
del(readings) # delete list to prepare for next run - RESULTS: Connect a second XBee, also configured to factory defaults, to your computer. Then use a terminal program like XCTU or CoolTerm to receive the sensor data. The results will show nothing for a minute, then you should see 10 data readings, sent all at once.
Aggregate Values Then Send Average
This example shows how to aggregate data before sending an average of the data, via an XBee in transparent mode.
- SETUP: Use the basic sensing setup.
- PROGRAM: Load the code sample into your pyboard’s main.py file
# main.py -- Aggregate Then Send Average v1.0 - XBee MicroPython
from pyb import Pin, ADC, UART      # load resources
uart = UART(4, baudrate=9600)       # create UART object on X1, X2
pin = ADC(Pin('Y12'))               # configure Y12 for ADC
period = 60000                      # length between sends
samples = 10                        # number of samples in a send
while True:                         # loop continuously
    readings=[]                        # create a list to store readings
    for i in range(samples):           # sample the right number of times
        temp = (int((pin.read() * (3300/4096)) - 500) / 10) # read analog TMP36 and transform
        readings.append(temp)              # put the sample in the list
        pyb.delay(int(period/samples))     # wait until the next sample
    uart.write(str(sum(readings)/samples)) # write averaged data
    uart.write(' Celsius avg.\n')      # write text label
del(readings) # delete list to prepare for next run - RESULTS: Connect a second XBee, also configured to factory defaults, to your computer. Then use a terminal program like XCTU or CoolTerm to receive the sensor data. The results will show nothing for a minute, then you should see an average of 10 samples.


Suppress Duplicate Data
This example shows how to suppress sending too many duplicate readings, via an XBee in transparent mode.
- SETUP: Use the basic sensing setup.
- PROGRAM: Load the code sample into your pyboard’s main.py file
# main.py -- Suppress Duplicate Data v1.0 - XBee MicroPython
from pyb import Pin, ADC, UART   # load resources
uart = UART(4, baudrate=9600)    # create UART object on X1, X2
pin = ADC(Pin('Y12'))            # configure Y12 for ADC
period = 60000                   # length between mandatory sends
percent_dif = 10              # percent change that triggers immediate send
last_temp = 0                    # stores last sent sensor value
start_time = pyb.millis()        # mark initial start time
while True:                      # loop continuously
    temp = (int((pin.read() * (3300/4096)) - 500) / 10) # read analog TMP36 and transform
    if pyb.millis() - start_time > period: # when it's madatory send time...
        start_time = pyb.millis()       # update start time
        uart.write(str(temp))           # write data
        uart.write(' Celsius\n')        # write text label
        last_temp = temp                # update last sensor value
    if abs(last_temp - temp) > last_temp * percent_dif/100: # significant changes trigger immediate send
        start_time = pyb.millis()       # update start time
        uart.write(str(temp))           # write data
        uart.write(' Celsius\n')        # write text label
        last_temp = temp                # update last sensor value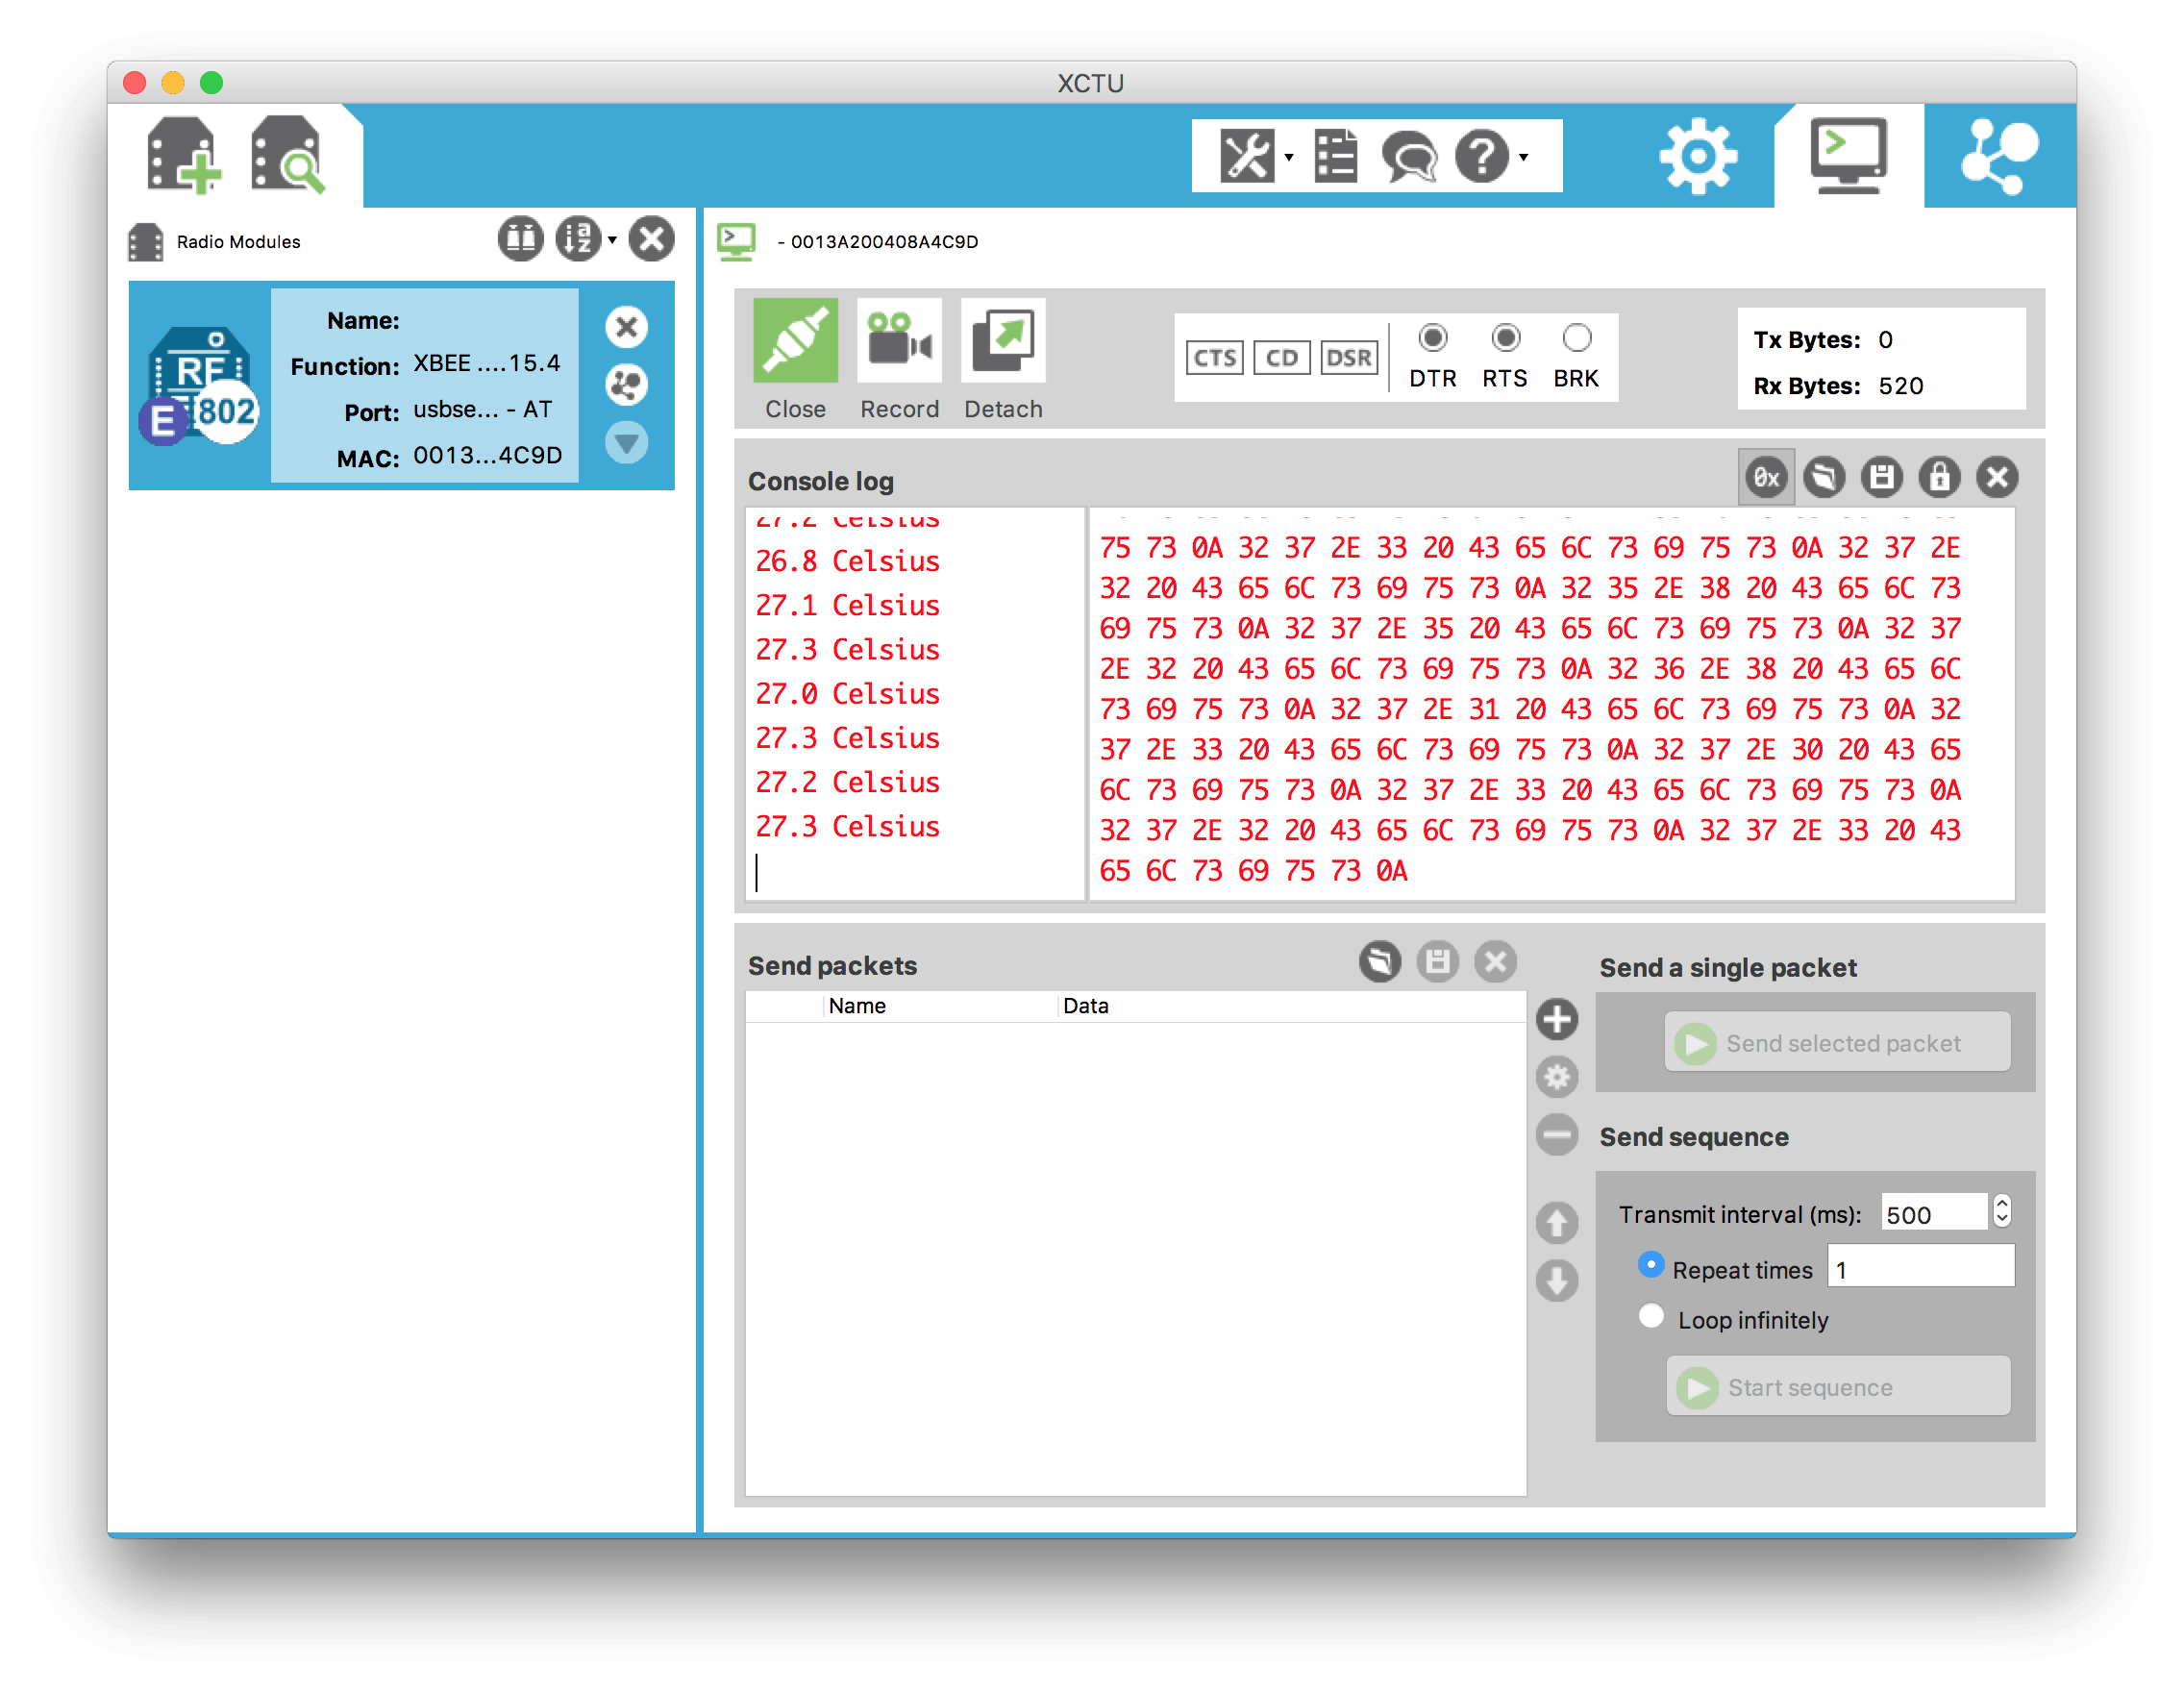
pyb.delay(1000) # wait between samples - RESULTS: Connect a second XBee, also configured to factory defaults, to your computer. Then use a terminal program like XCTU or CoolTerm to receive the sensor data. The results will show readings every minute, with changes greater than 10% triggering an immediate reading.
Local Control
This example shows how to turn local input into local actions, with alert messages about important events delivered remotely.
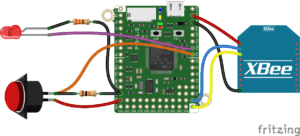
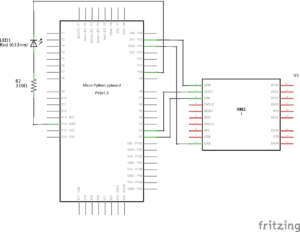
- SETUP: Connect the XBee (configured to factory defaults), an LED and a sensor switch as shown below. You can use the XBee pyboard skin to easily connect the radio module, and a small breadboard connected with jumper wires for the LED, the switch and their resistors.
- PROGRAM: Load the code sample into your pyboard’s main.py file
# main.py -- Local Control v1.0 - XBee MicroPython
from pyb import Pin, ADC, UART    # load resources
uart = UART(4, baudrate=9600)     # create UART object on X1, X2
sensor_pin = Pin('Y9', Pin.IN)    # configure Y9 for digital input
alarm_pin = Pin('Y10', Pin.OUT_PP) #configure Y10 for digital output
delay = 60000             # delay in milliseconds before triggering alarm
while True:                       # loop continuously
    if sensor_pin.value() == 1:      # if sensor input goes high
        start_time = pyb.millis()       # mark the time
        while sensor_pin.value() == 1:   # keep monitoring inupt
            if pyb.millis() - start_time >= delay: # if sensor remains on for delay time
                alarm_pin.high()                 # turn on the local alarm
                if not (pyb.millis() - start_time + delay) % 60000: # once a minute
                    uart.write('Alarm\n')            # send a text alert
                else:                            # when sensor is low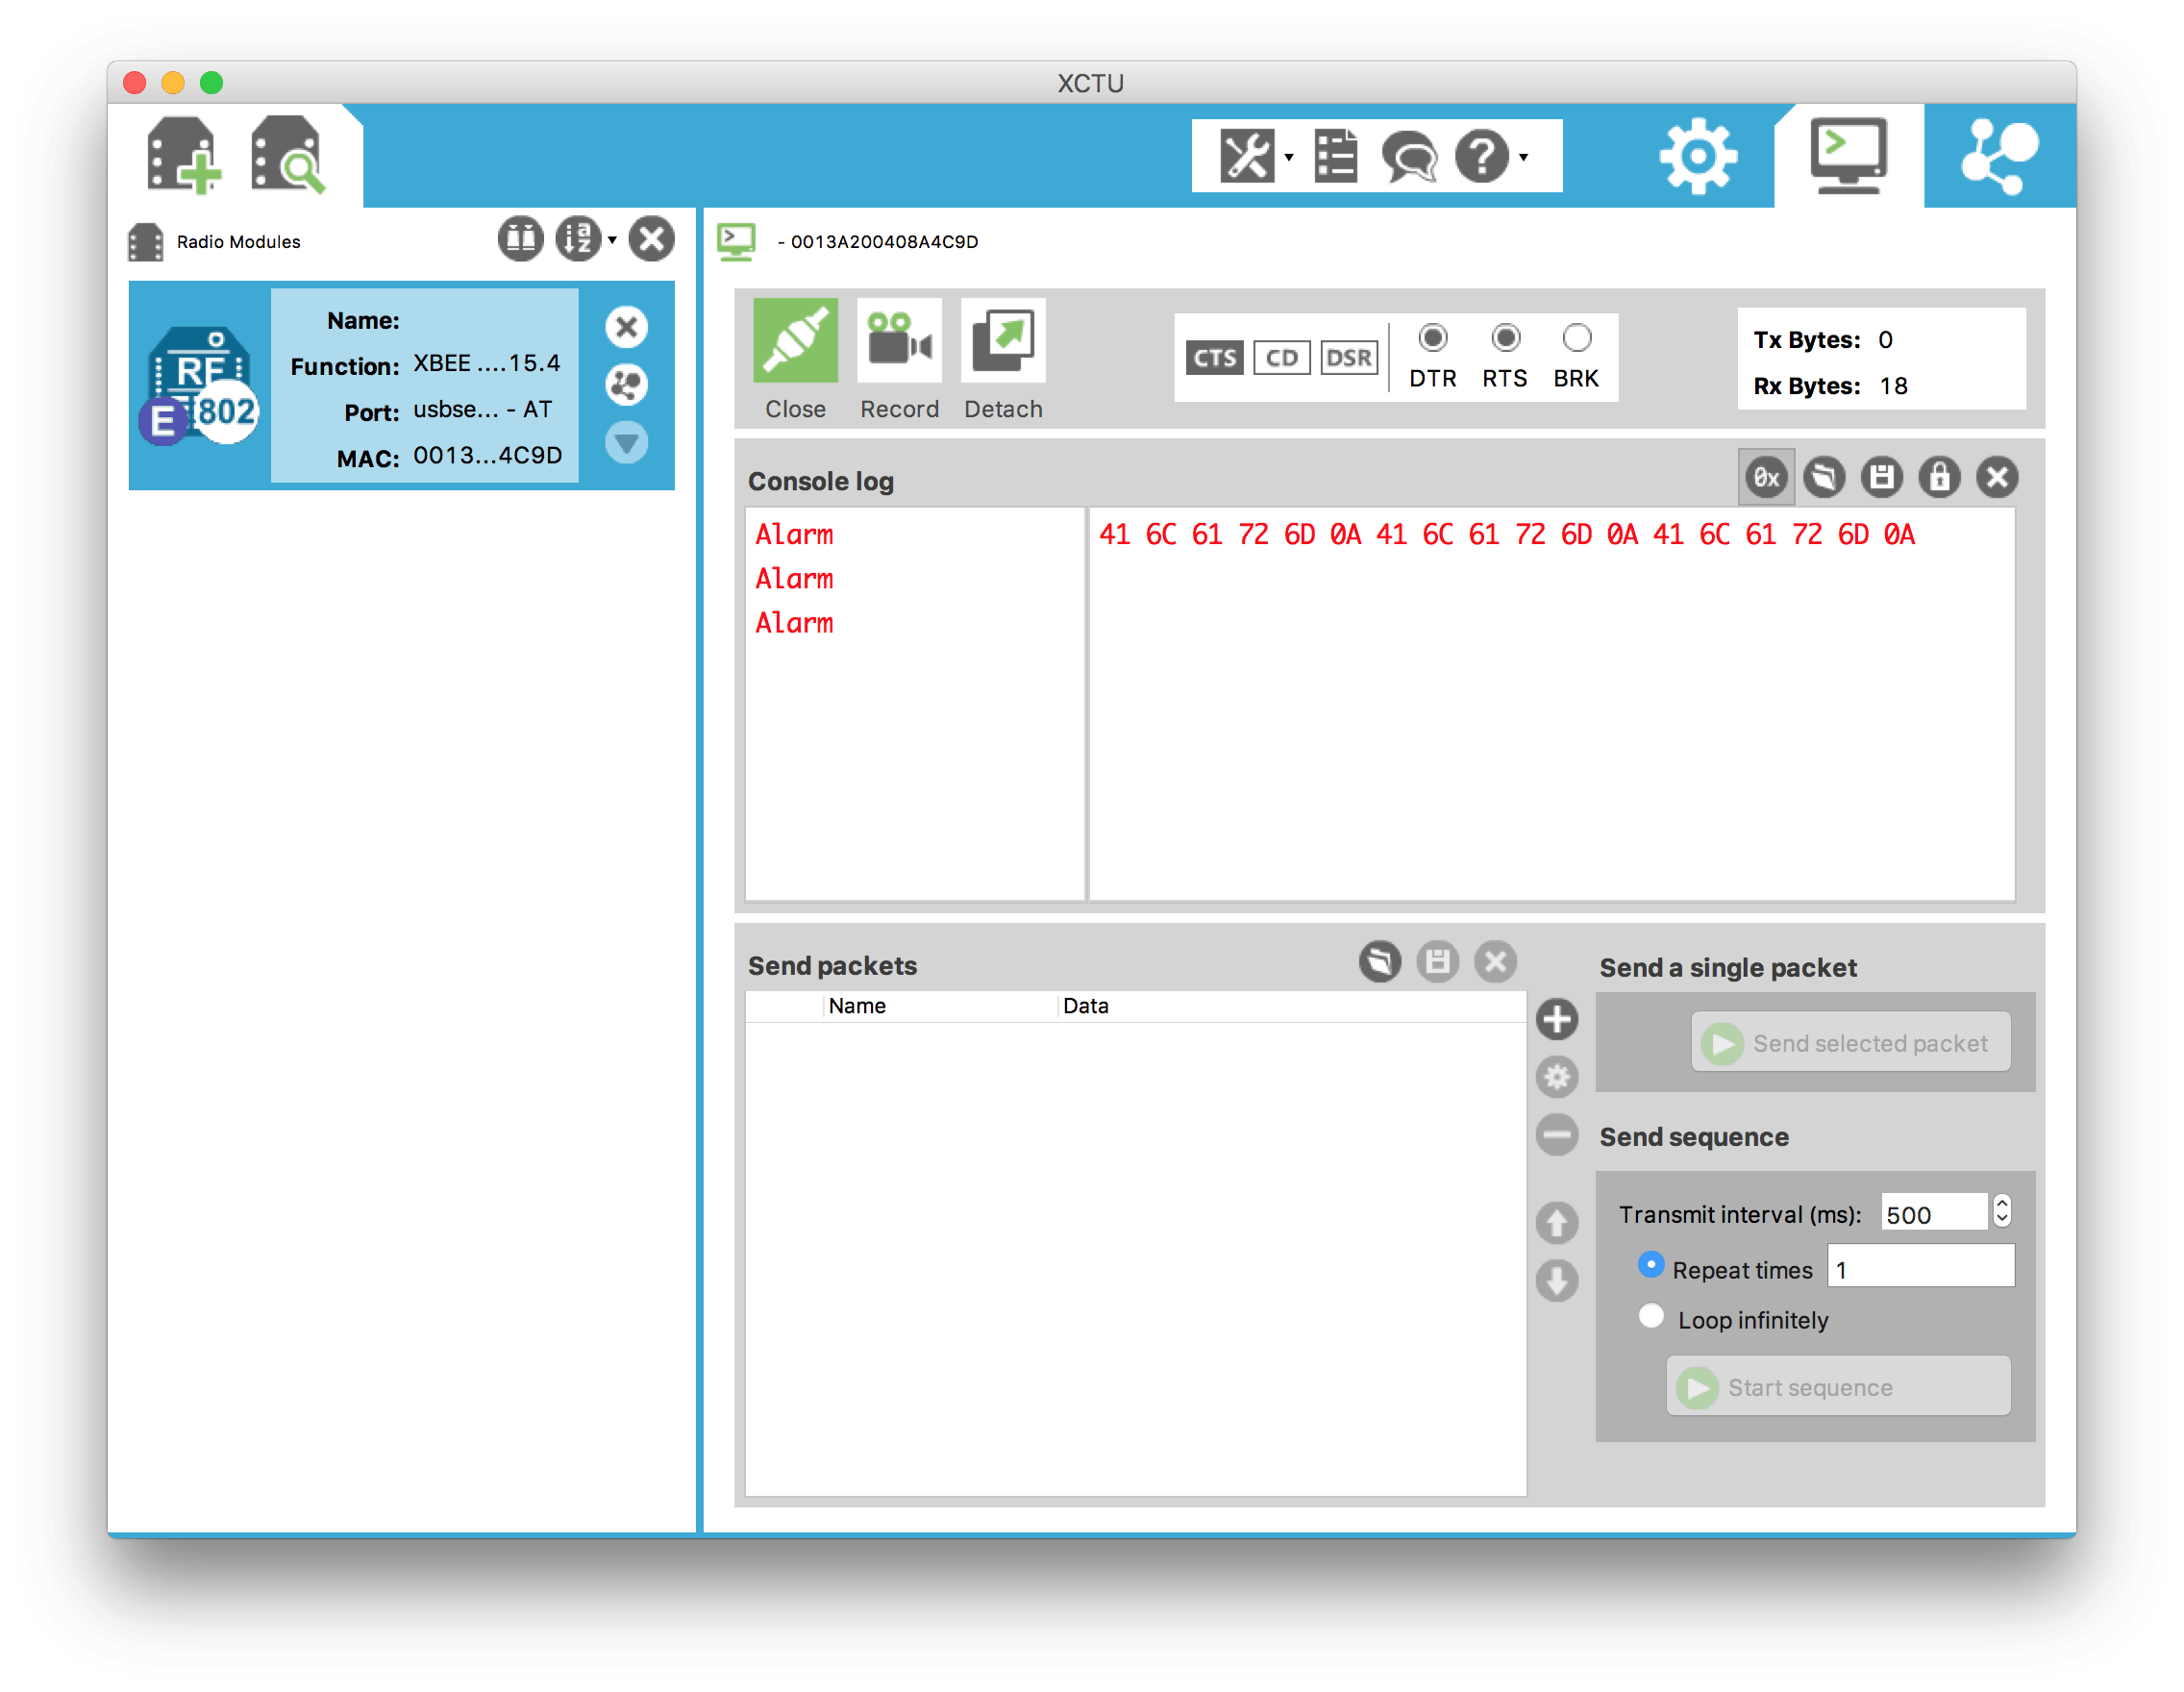
alarm_pin.low() # turn alarm off - RESULTS: Connect a second XBee, also configured to factory defaults, to your computer. Then use a terminal program like XCTU or CoolTerm to receive the alarm alerts. After the switch has been pressed continuously for 60 seconds, the alarm light will turn on. You will receive text alerts in the terminal every minute until the button is released.


Transform UART
This example shows how to accept incoming text strings and transform them to different outgoing text strings.
- SETUP: Use the hello world setup.
- PROGRAM: Load the code sample into your pyboard’s main.py file
# main.py -- Transform UART v1.0 - XBee MicroPython
from pyb import UART            # load UART resources
uart = UART(4, baudrate=9600)   # create UART object for radio
while True:                     # loop continuously
    if uart.any() >= 3:            # if there's 3 or more bytes to read
        if 'hw' in uart.readline(): # look for 'hw' input with a linefeed from host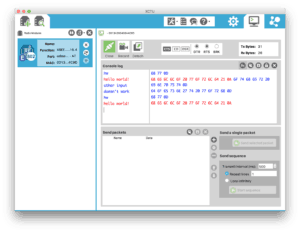
uart.write('hello world!\n') # write transformed output to radio - RESULTS: Connect a second XBee, also configured to factory defaults, to your computer. Next, using a terminal program like XCTUor CoolTerm, type “hw” into the active window followed by a return. You should receive “hello world” back as shown below. All text input that doesn’t contain “hw” should be ignored.

Respond to Data Request
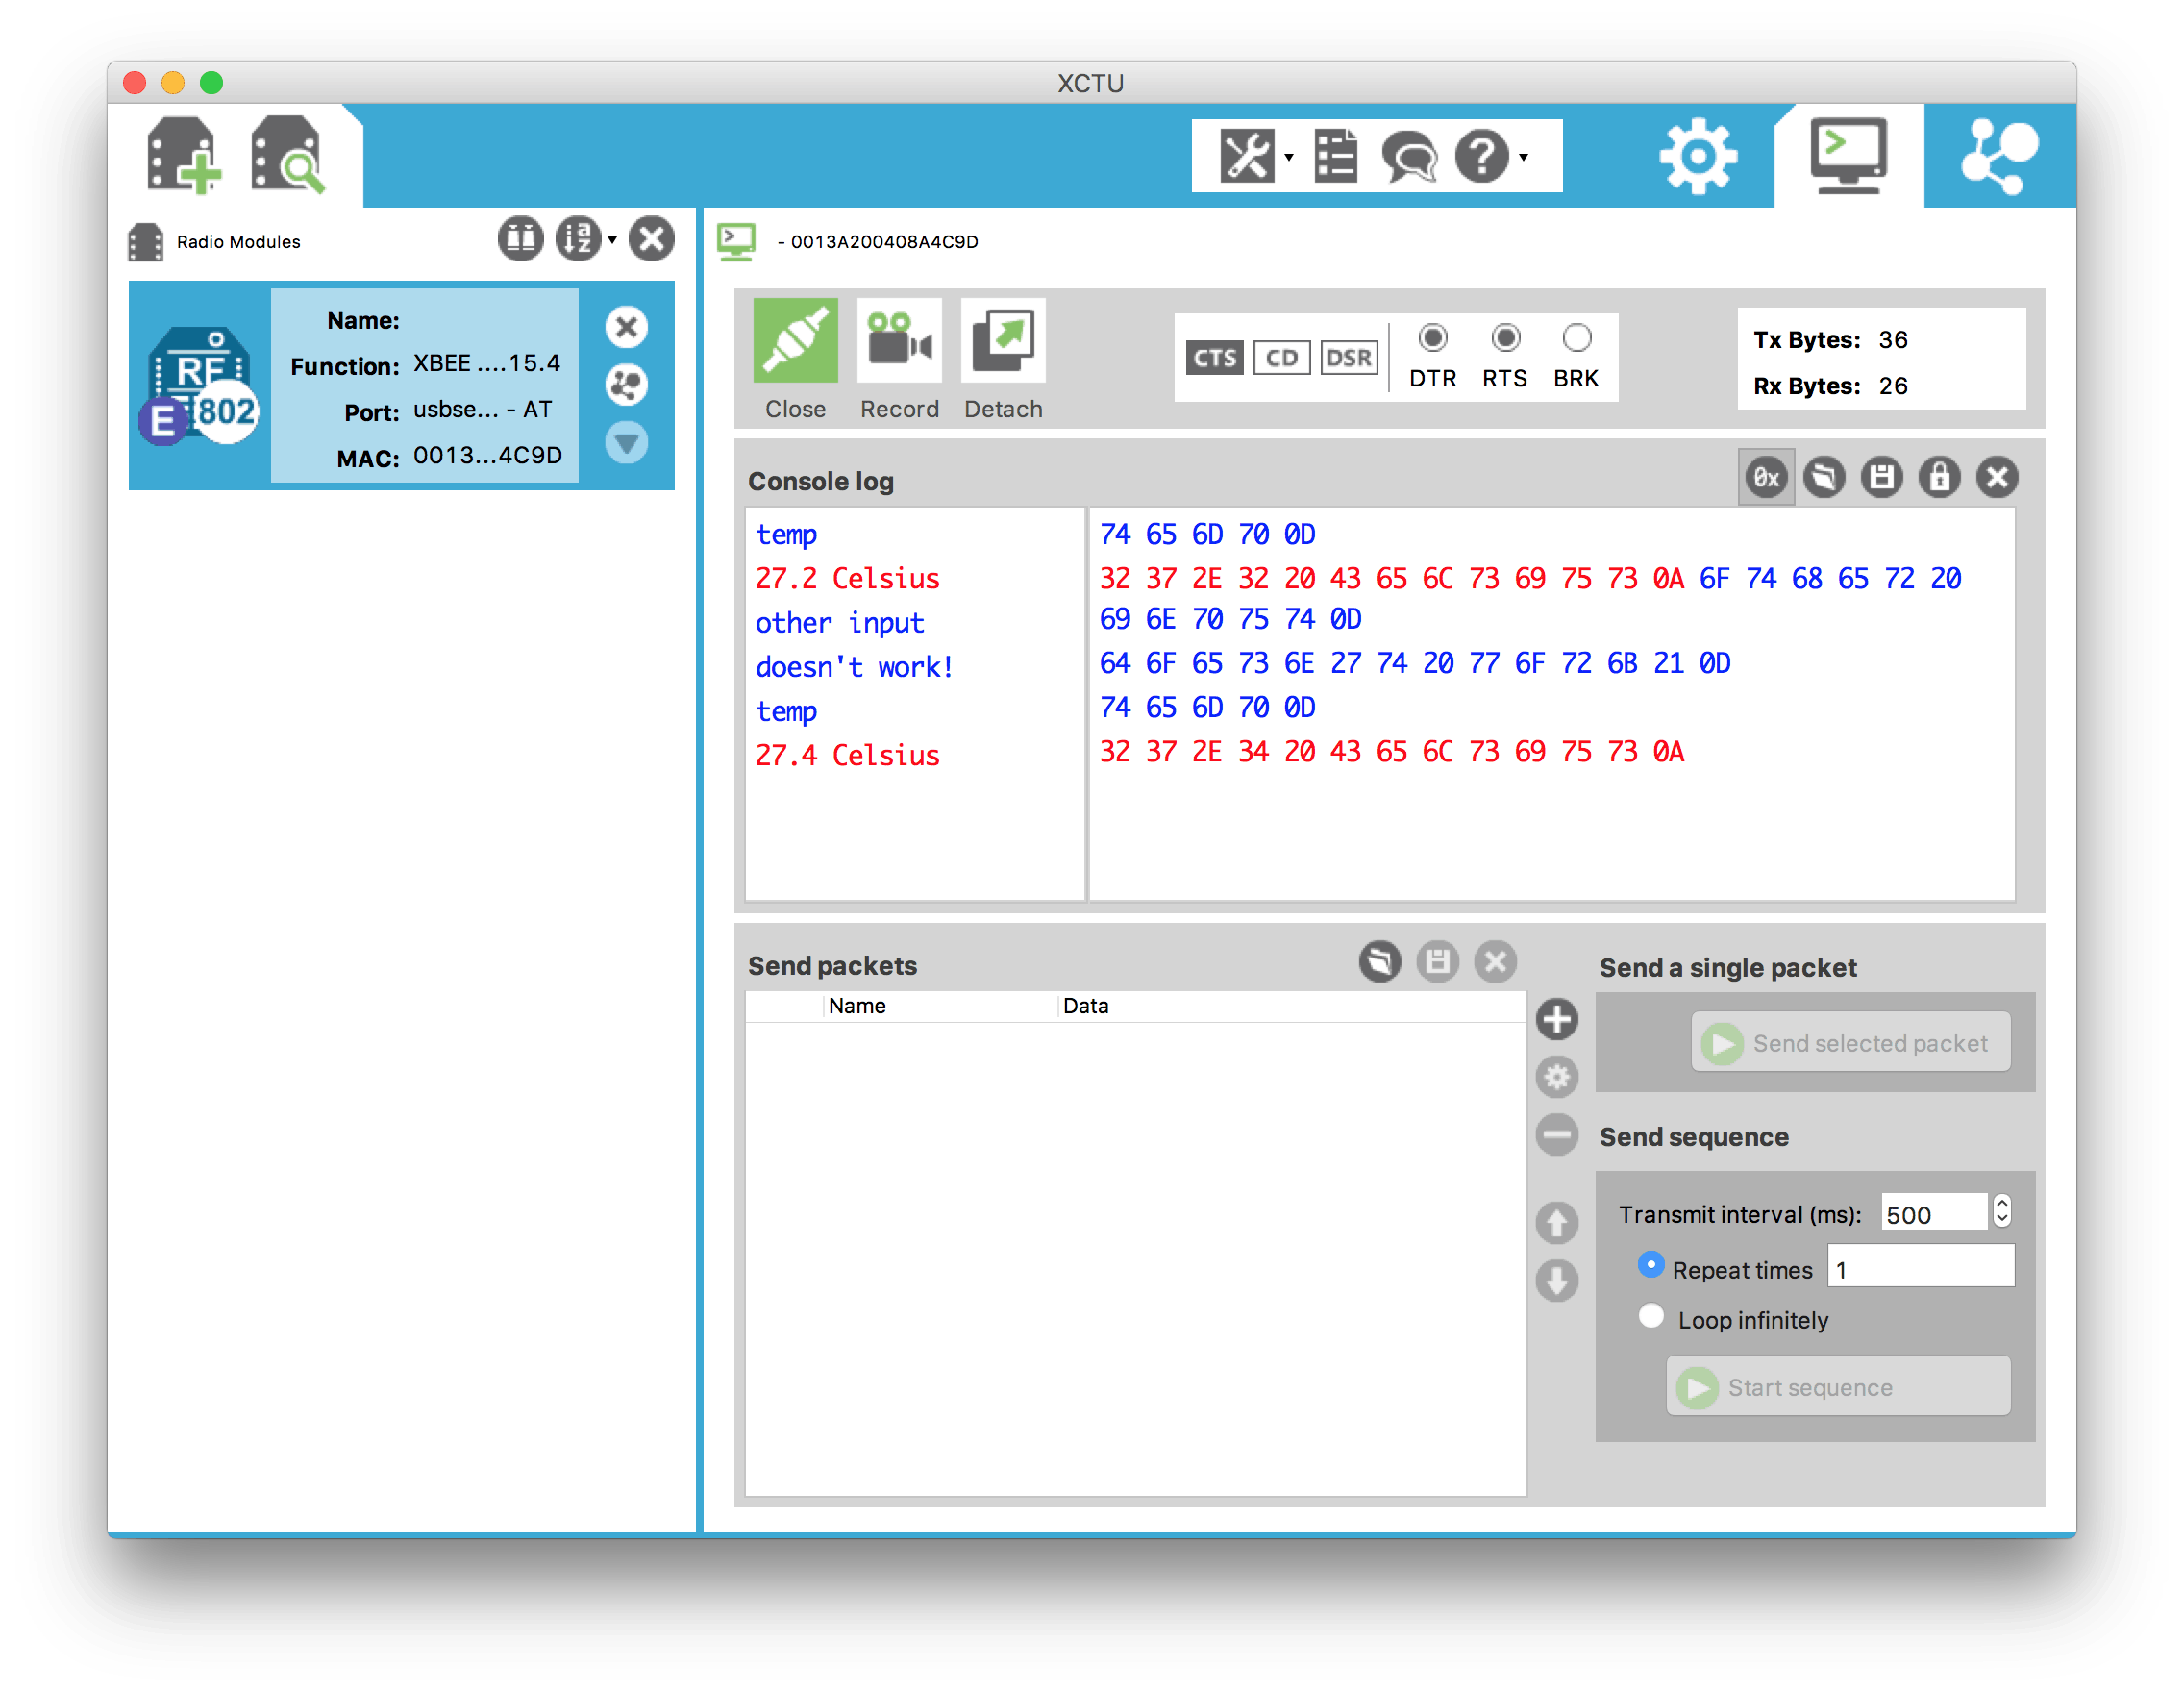
This example shows how to accept an incoming serial text command and respond with a sensor data reading.
- SETUP: Use the basic sensing setup.
- PROGRAM: Load the code sample into your pyboard’s main.py file
# main.py -- Respond to Data Request v1.0 - XBee MicroPython
from pyb import UART, Pin, ADC     # load resources
uart = UART(4, baudrate=9600)      # create UART object
pin = ADC(Pin('Y12'))              # configure Y12 for ADC
while True:
    if uart.any() >= 5:               # if there's 5 or more bytes to read
        if 'temp' in uart.readline():     # look for sensor request
            temp = (int((pin.read() * (3300/4096)) - 500) / 10) # read analog TMP36 and transform
            uart.write(str(temp))             # write data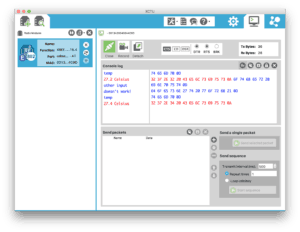
uart.write(' Celsius\n') # write text label - RESULTS: Connect a second XBee, also configured to factory defaults, to your computer. Next, using a terminal program like XCTUor CoolTerm, type “temp” into the active window followed by a return. You should receive a temperature reading back as shown below. All text input that doesn’t contain “temp” should be ignored.
Control Pin via UART
This example shows how to turn an LED on and off using serial text input, via an XBee in transparent mode.
- SETUP: Connect the XBee (configured to factory defaults), and an LED as shown below. You can use the XBee pyboard skin to easily connect the radio module, and a small breadboard connected with jumper wires for the LED and resistor.

- PROGRAM: Load the code sample into your pyboard’s main.py file
# main.py -- Control Pin via UART v1.0 - XBee MicroPython
from pyb import UART, Pin           # load resources
uart = UART(4, baudrate=9600)       # create UART object
output_pin = Pin('Y10', Pin.OUT_PP) #configure Y10 for digital output
while True:                         # loop continuously
    if uart.any() >= 3:               # if there's 3 or more bytes to read
        incoming = uart.readline()         # read from the UART
        if 'on' in incoming:               # look for 'on' command
            output_pin.high()                  # turn on the LED
            uart.write('pin on\n')             # write status
        if 'off' in incoming:              # look for 'off' command
            output_pin.low()                   # turn off the LED
uart.write('pin off\n') # write status - RESULTS: Connect a second XBee, also configured to factory defaults, to your computer. Next, using a terminal program like XCTUor CoolTerm, type “on” into the active window followed by a return. You should receive “pin on” back as shown below, and the LED should turn on. Type “off” followed by a return to douse the LED and receive “pin off” as confirmation. All text input that doesn’t contain “on” or “off” should be ignored.


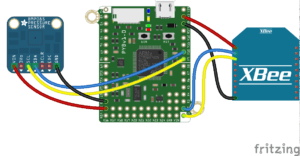
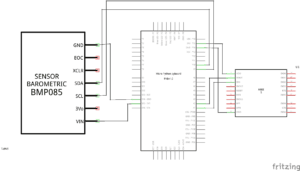
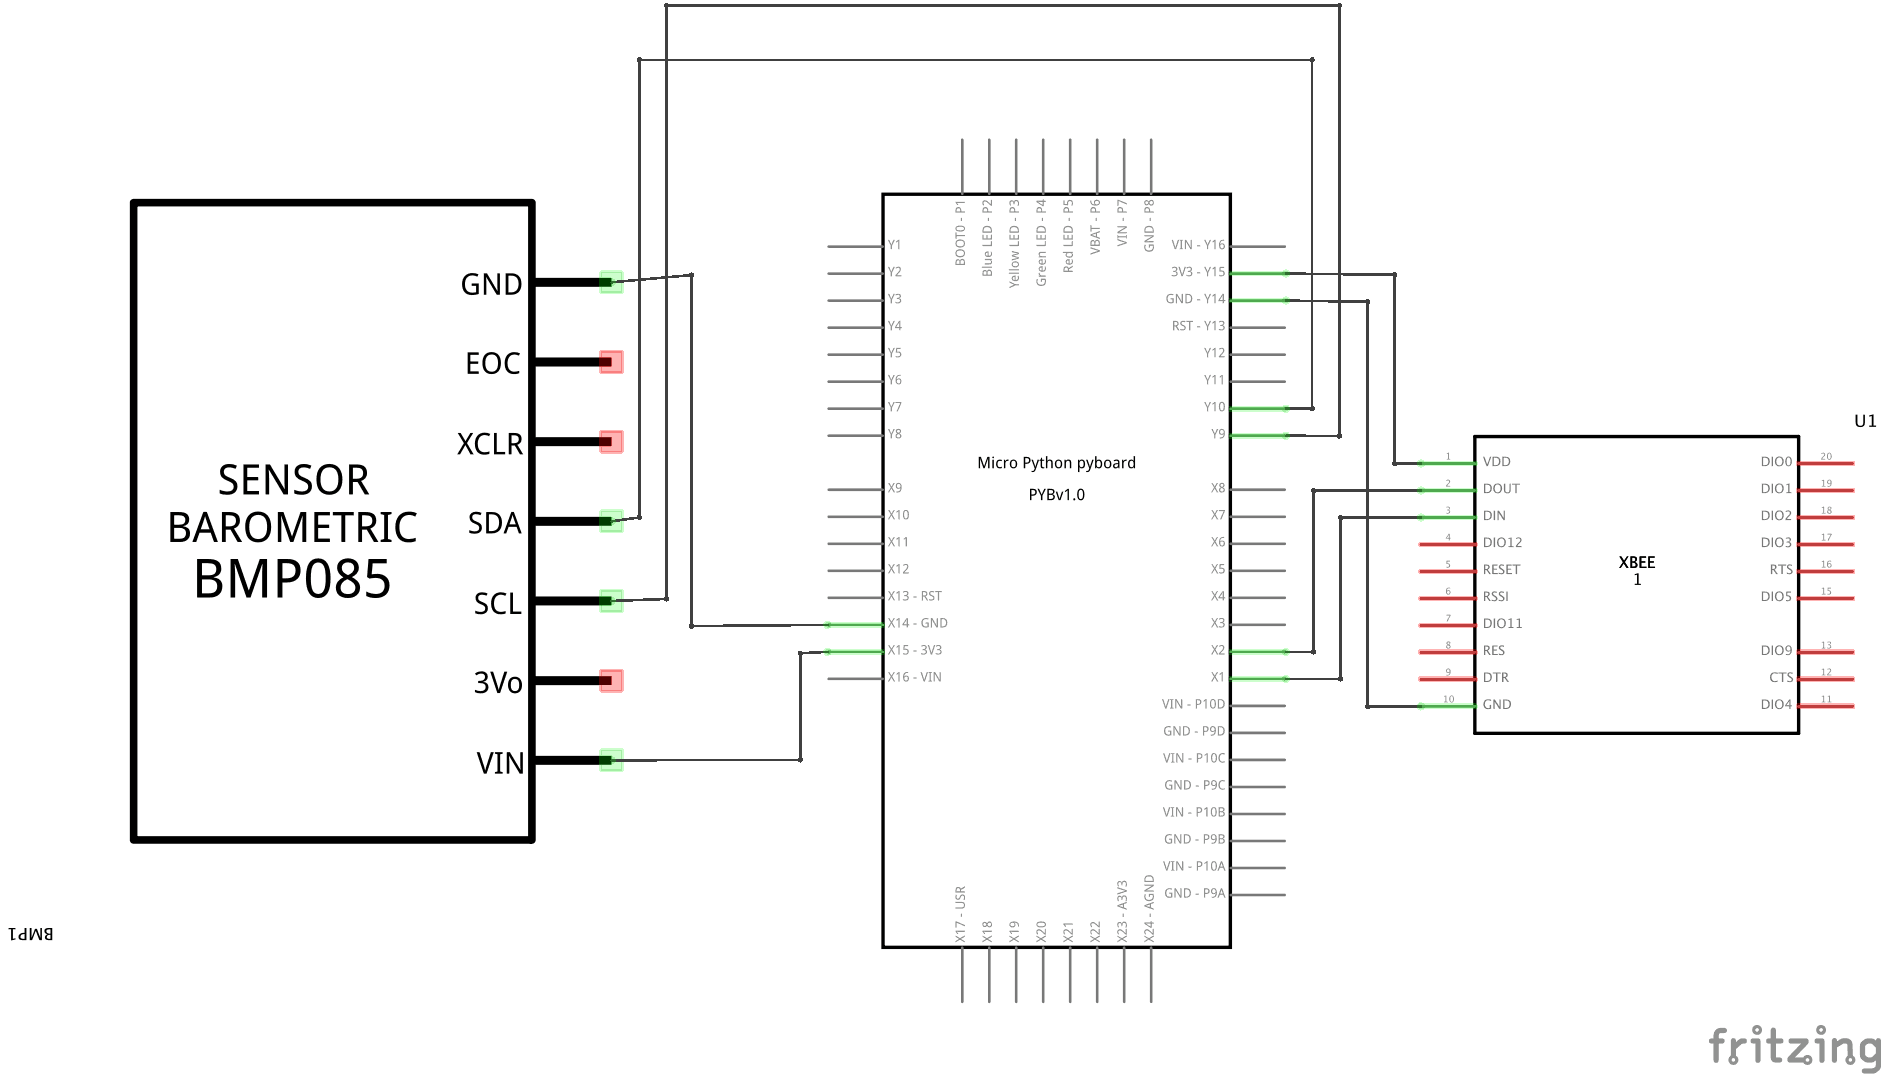
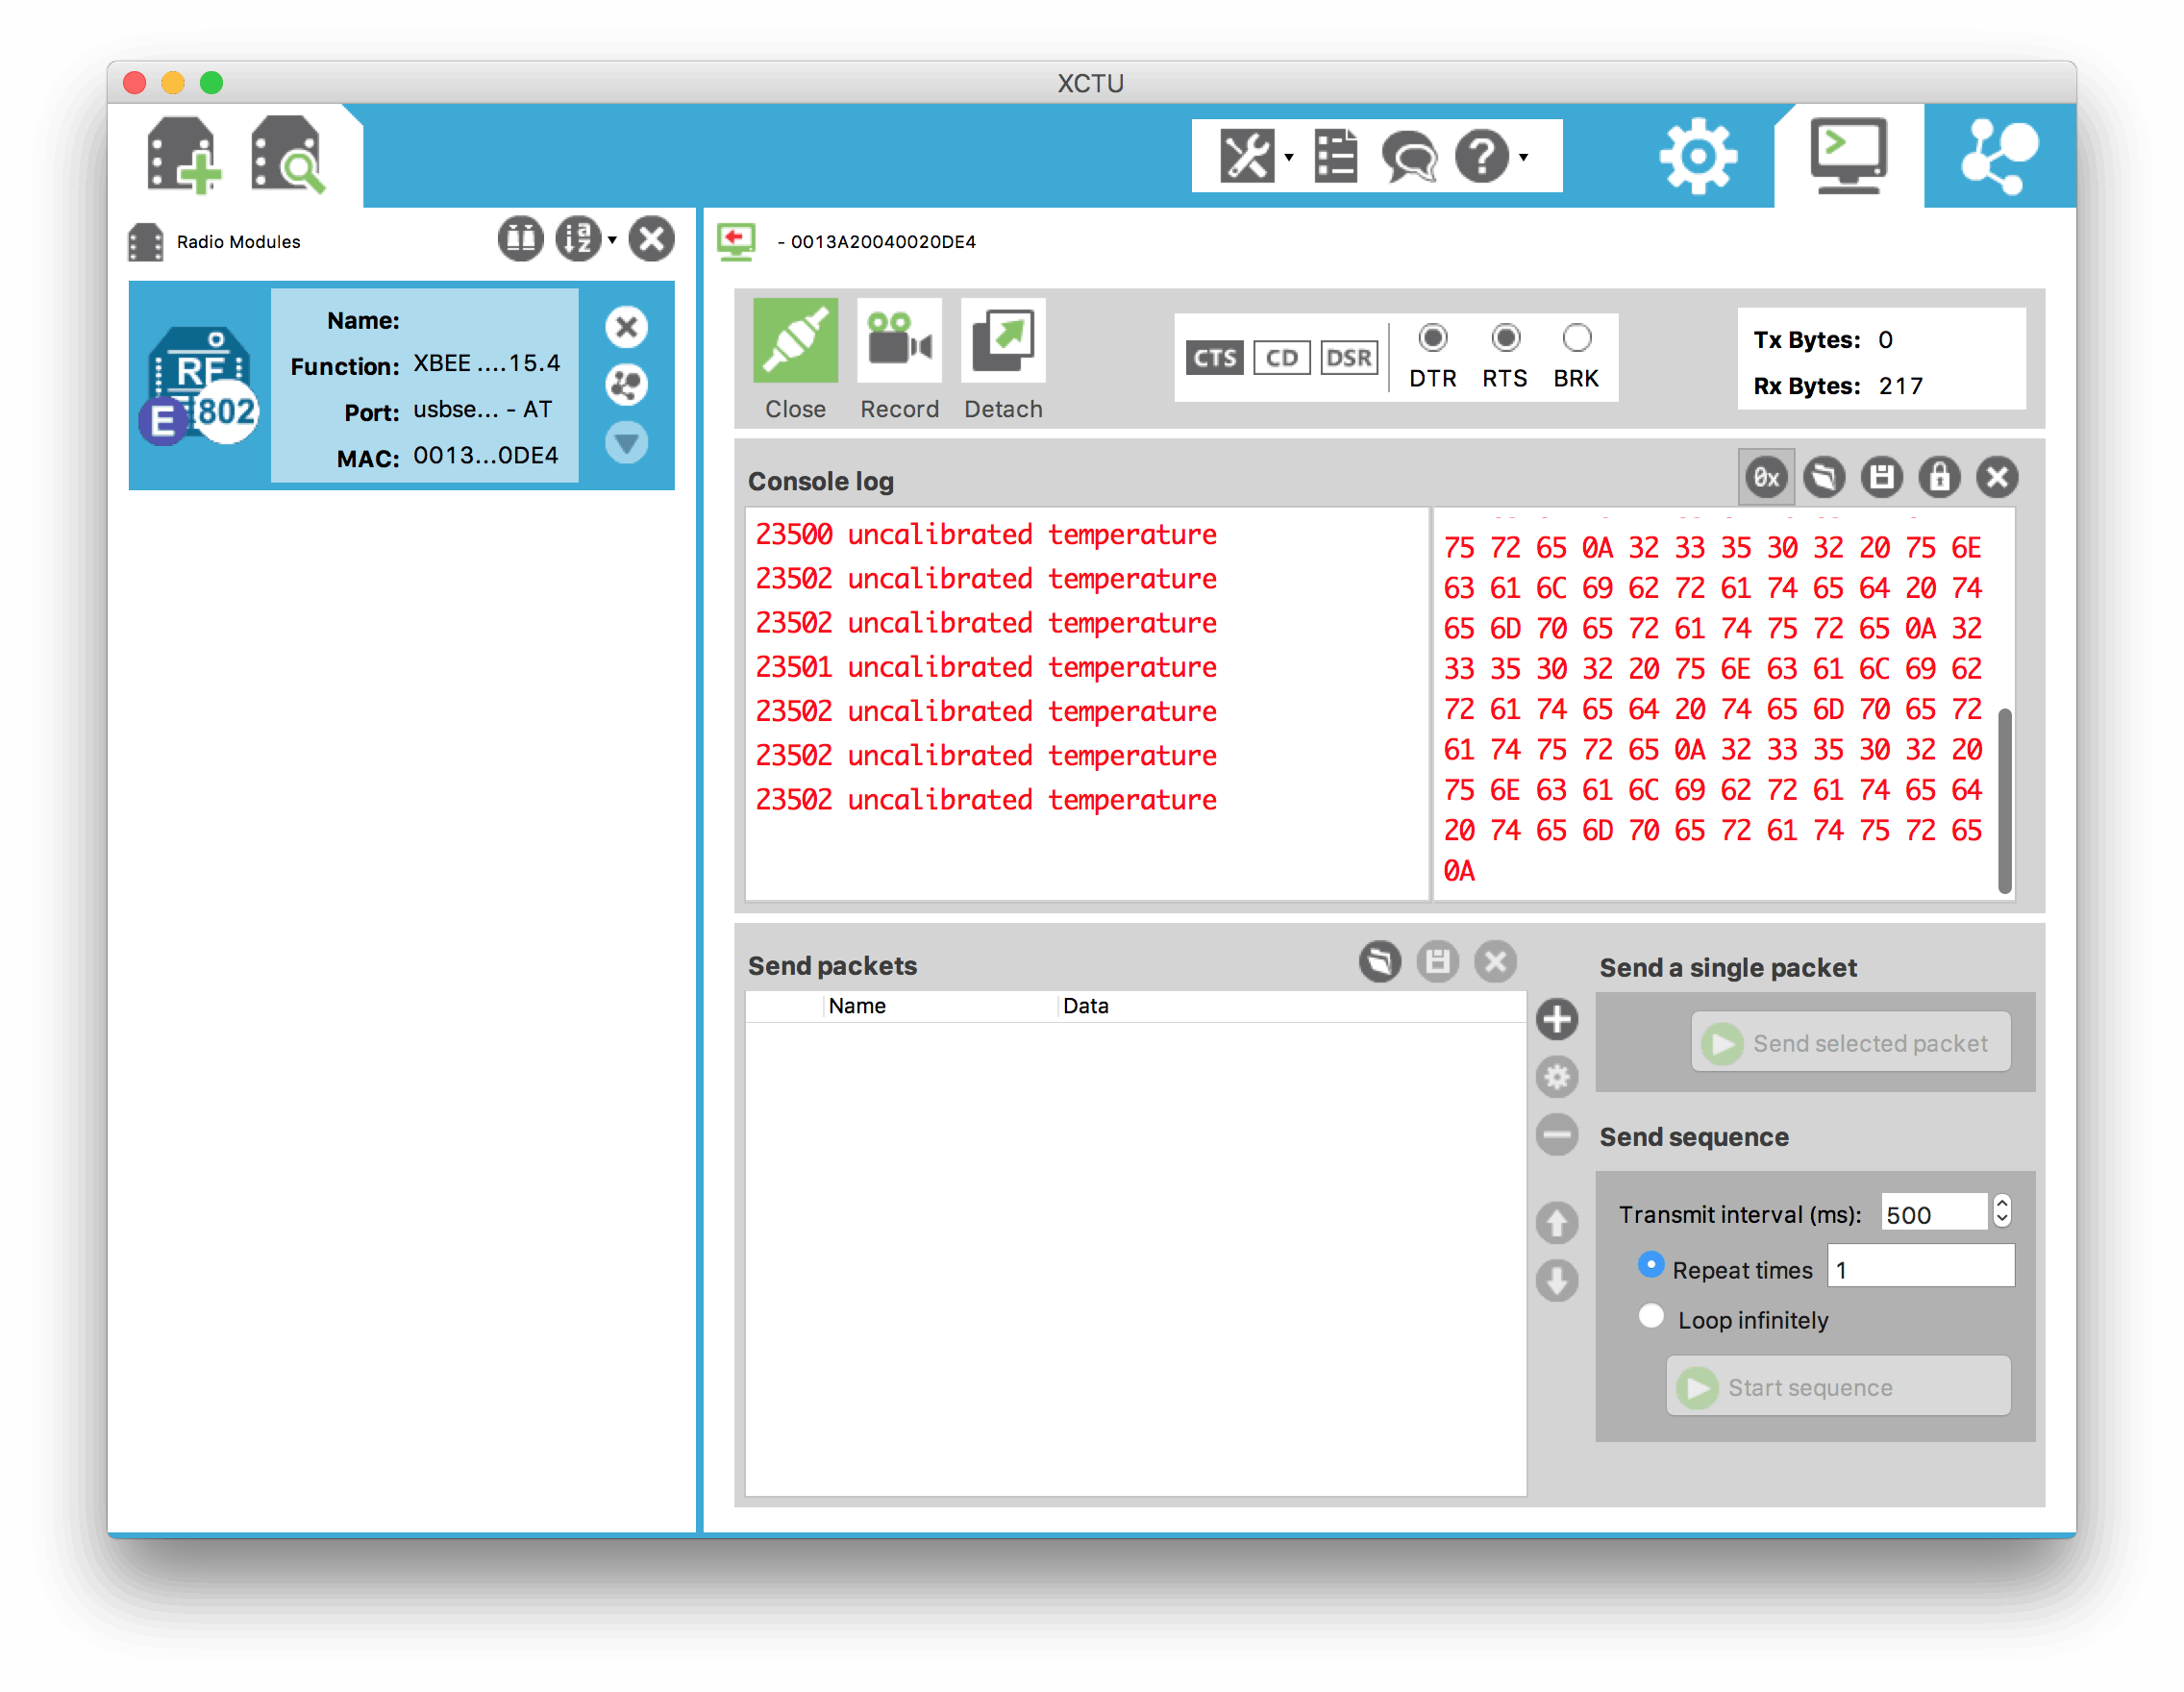
Basic I2C Sensor Read
This example shows how to do a very basic read an I2C sensor (the BMP180), via an XBee in transparent mode.
- SETUP: Connect the XBee (configured to factory defaults), and the BMP180 as shown below (same connections as older BMP085). You can use the XBee pyboard skin to easily connect the radio module, and a small breadboard connected with jumper wires for the BMP180.
- PROGRAM: Load the code sample into your pyboard’s main.py file
# main.py -- Basic I2C Sensor Read - XBee MicroPython
from pyb import UART, Pin, I2C     # load resources
from struct import unpack          # resource to unpack readings
uart = UART(4, baudrate=9600)      # create UART object
i2c = I2C(2, I2C.MASTER)           # create I2C object on bus 2
while True:                        # loop continuously
    i2c.mem_write(0x2E, 0x77, 0xF4, timeout=1000) # writing 2E to slave 0x77's 0xF4 address initiates a temp. reading
    pyb.delay(5)                      # wait > 4.5 milliseconds for reading
    temp = i2c.mem_read(2, 0x77, 0xF6) # read 2 bytes starting memory address 0xF6 of slave 0x77
    temp = unpack(">h", temp)[0]   # unpack the readings as a big endian short
    uart.write(str(temp))             # write data
    uart.write(' uncalibrated temperature\n') # write label
pyb.delay(1000) # wait a second between samples - RESULTS: Connect a second XBee, also configured to factory defaults, to your computer. Then use a terminal program like XCTU or CoolTerm to receive the sensor data. The results will show raw, uncalibrated numbers from the temperature sensor since that’s all this example asks for. Warm the sensor with your hand to watch the numbers increase, then let it cool to see them decrease:

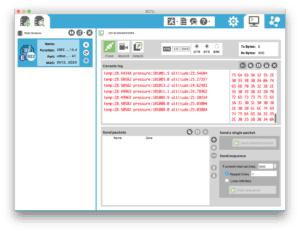
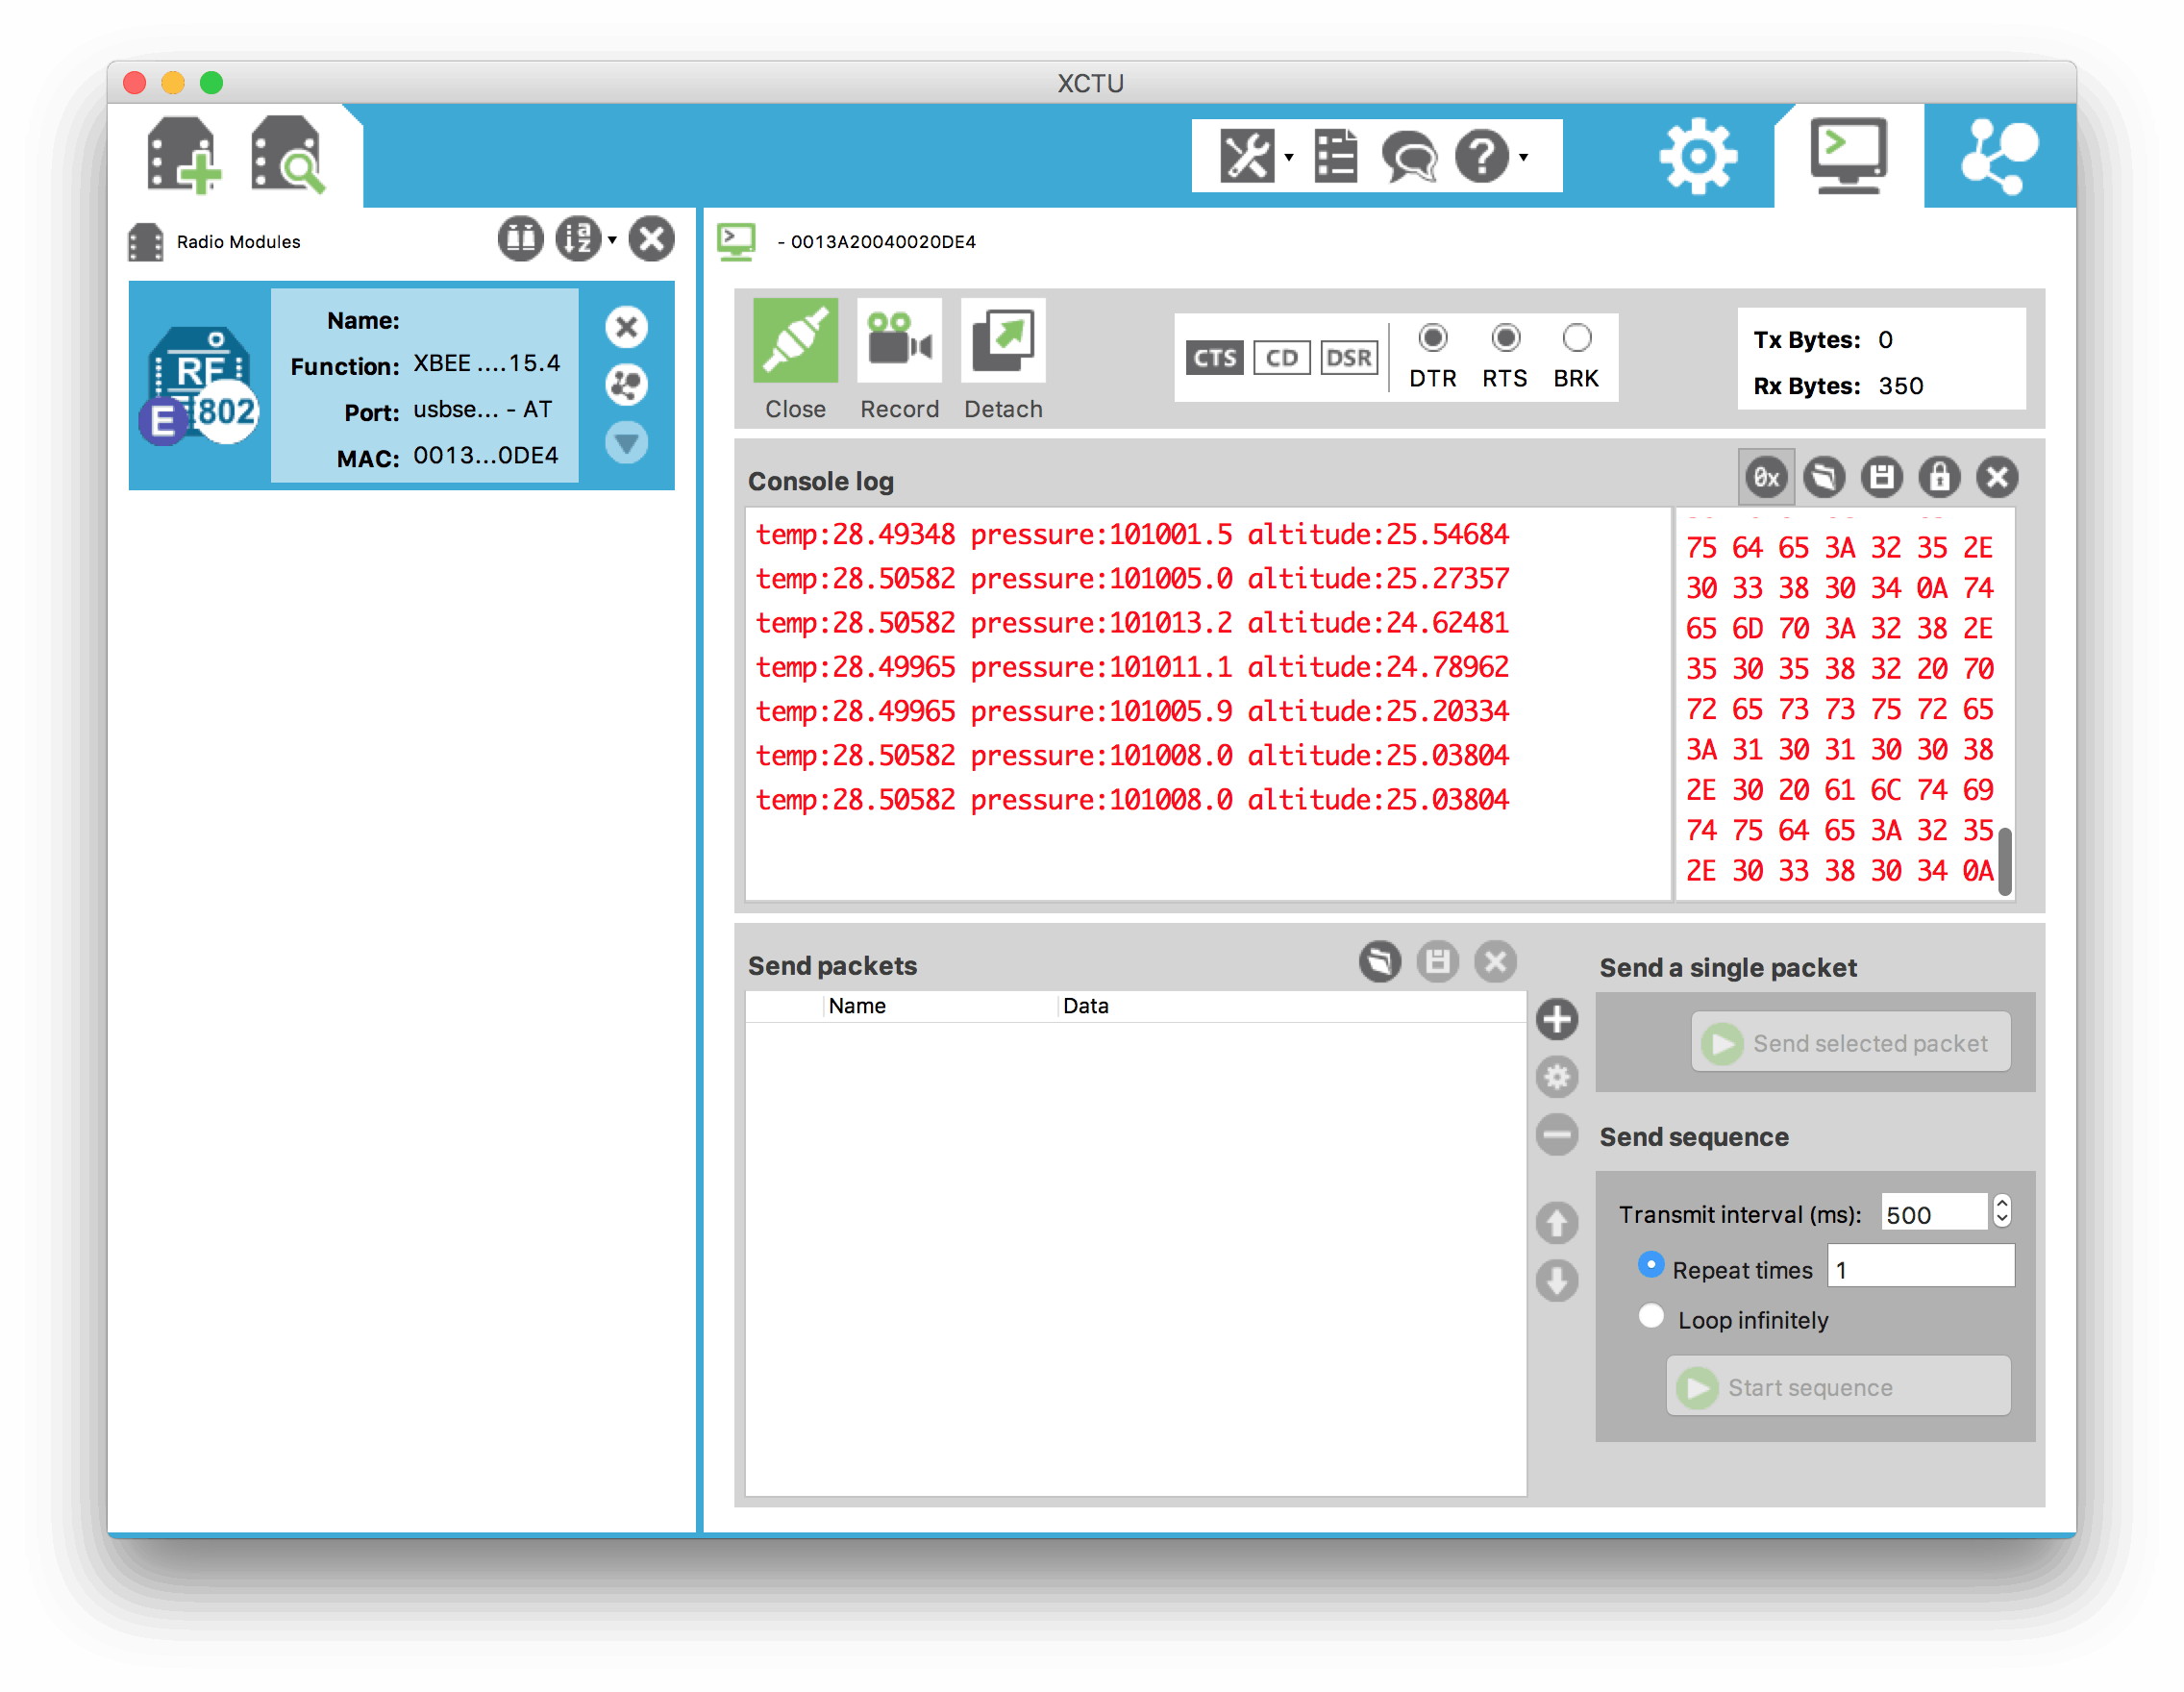
Full BMP180 I2C
This example shows how to fully read an I2C sensor (the BMP180), via an XBee in transparent mode.
- SETUP: Use the BMP180 setup.
- PROGRAM: Load the code sample into your pyboard’s main.py file, then download the BMP180 library and put it into the same directory.
# main.py -- Full BMP180 I2C - XBee MicroPython
from pyb import UART          # load resources
from bmp180 import BMP180     # load library for BMP180
bmp180 = BMP180()             # create BMP180 object
bmp180.oversample_sett = 2    # take two samples for each reported
bmp180.baseline = 101325      # set baseline altitude
uart = UART(4, baudrate=9600) # create UART object
while True:                   # loop continuously
    temp = bmp180.temperature    # take a calibrated temp reading
    p = bmp180.pressure          # take a calibrated pressure reading
    altitude = bmp180.altitude   # take a calibrated altitude reading
    uart.write('temp:')          # write data and labels
    uart.write(str(temp))
    uart.write(' pressure:')
    uart.write(str(p))
    uart.write(' altitude:')
    uart.write(str(altitude))
    uart.write('\n')
pyb.delay(1000) # wait a second between samples - RESULTS: Connect a second XBee, also configured to factory defaults, to your computer. Then use a terminal program like XCTU or CoolTerm to receive the sensor data. The results will show calibrated temperature, pressure and altitude readings. Warm the sensor with your hand, and raise or lower it by a few meters to change the readings:
Resources
Simulating Limited RAM
To simulate 12KB of total RAM on the 192KB pyboard, use this block of code at the start of your program, or imported in a config.py file.
from gc import collect, mem_free       # load only the resources needed
collect()                     # perform a garbage collection just to be sure
print ("original memory:", mem_free()) # memory should start
fill = mem_free() - (12000 - 2784)     # free memory - (RAM - framework)
blocker = ' ' * fill                   # create a block of
print ("memory now:", mem_free())      # memory should be about 9K now
Parts
Here are links to some of the components used in these examples:
Thanks for sharing such valuable information.
Can you please also guide:
1. How to do a implementation using 16 bit and 64 addresses in API mode.
2. One to many and vice versa communication.